15 Easy Lightroom Tips Every Beginner Should Know
Starting with Lightroom can feel confusing. Too many sliders, too many panels, and no clear idea of what actually matters. The good news is this: you don’t need advanced techniques to get great results. Small, simple adjustments already make a huge difference. This guide covers 15 easy Lightroom tips for beginners.

No complex theory, no over-editing — just practical steps that help your photos look cleaner, more balanced, and more professional right away.
LIGHTROOM PRESETS
If you want to level up your photo editing and color grading, I’ve put together a page with my favorite presets — the ones that actually work — plus exclusive discounts. Open it in a new tab and save it for later, so you always have a go-to place for reliable tools and inspiration.
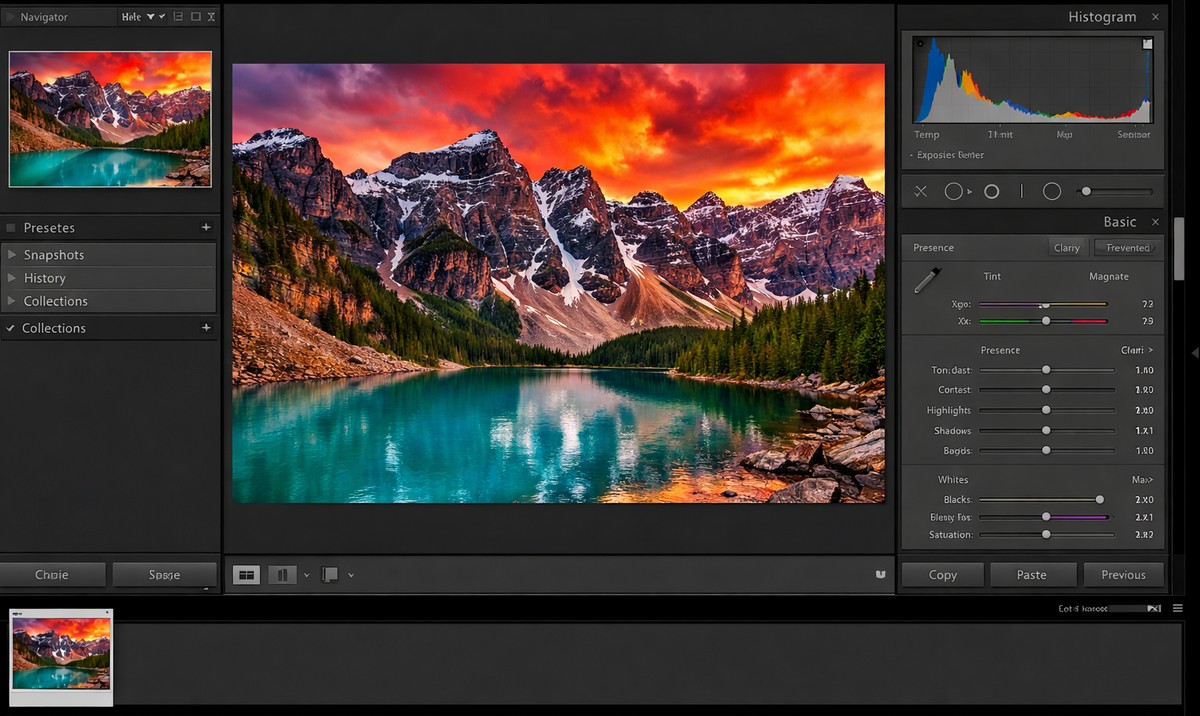
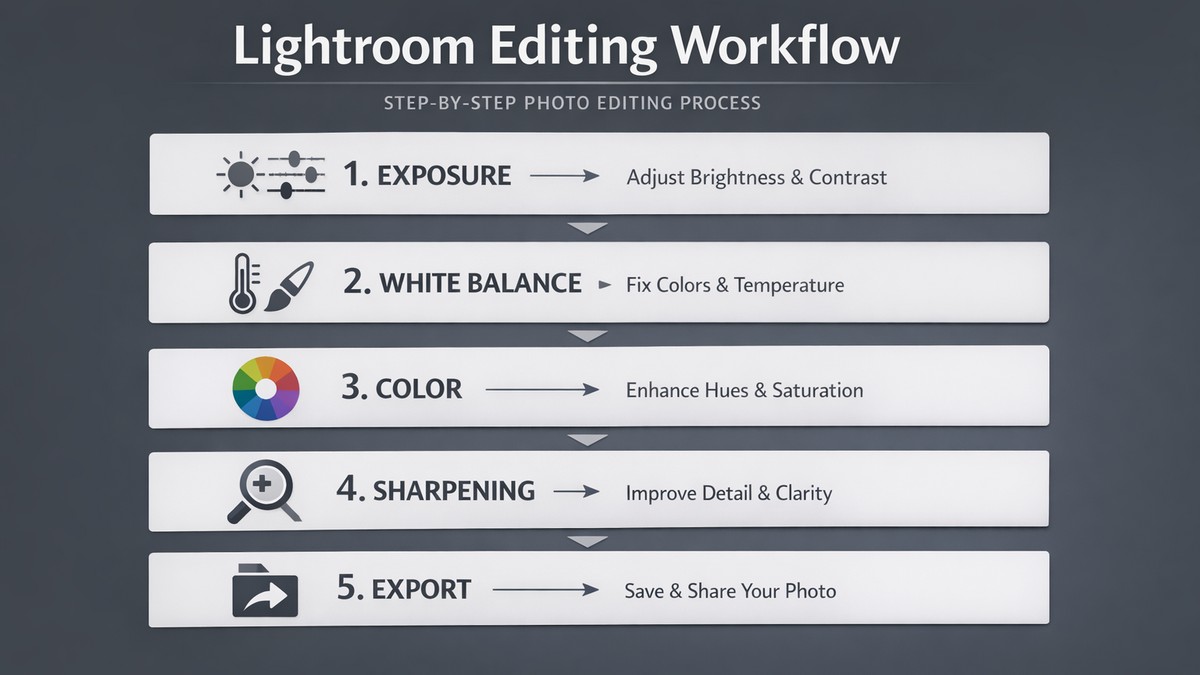
FIND YOUR STYLE1. Always Start With Exposure, Not Color
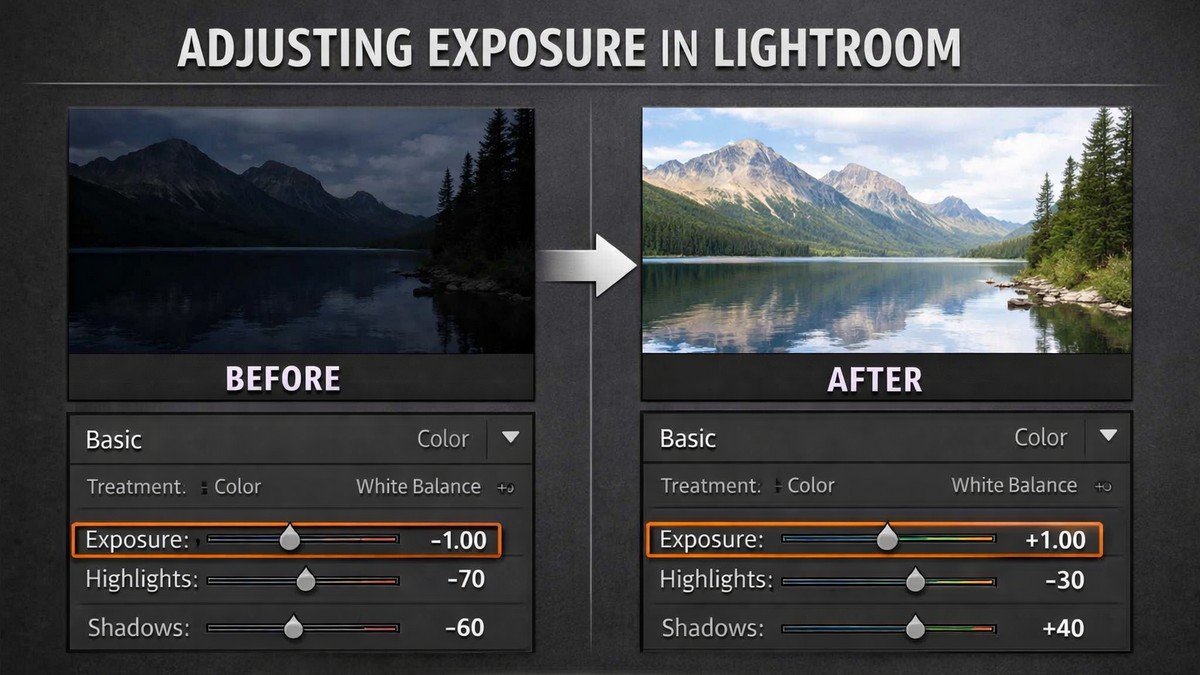
Beginners often jump straight into colors. That’s a mistake.
Color adjustments behave very differently depending on exposure.
Before touching saturation or presets:
- fix overall brightness
- recover highlights
- lift shadows gently
A well-exposed photo is already halfway edited.
2. Use Profiles Before Sliders
Profiles are often ignored, but they set the tone of the entire edit.
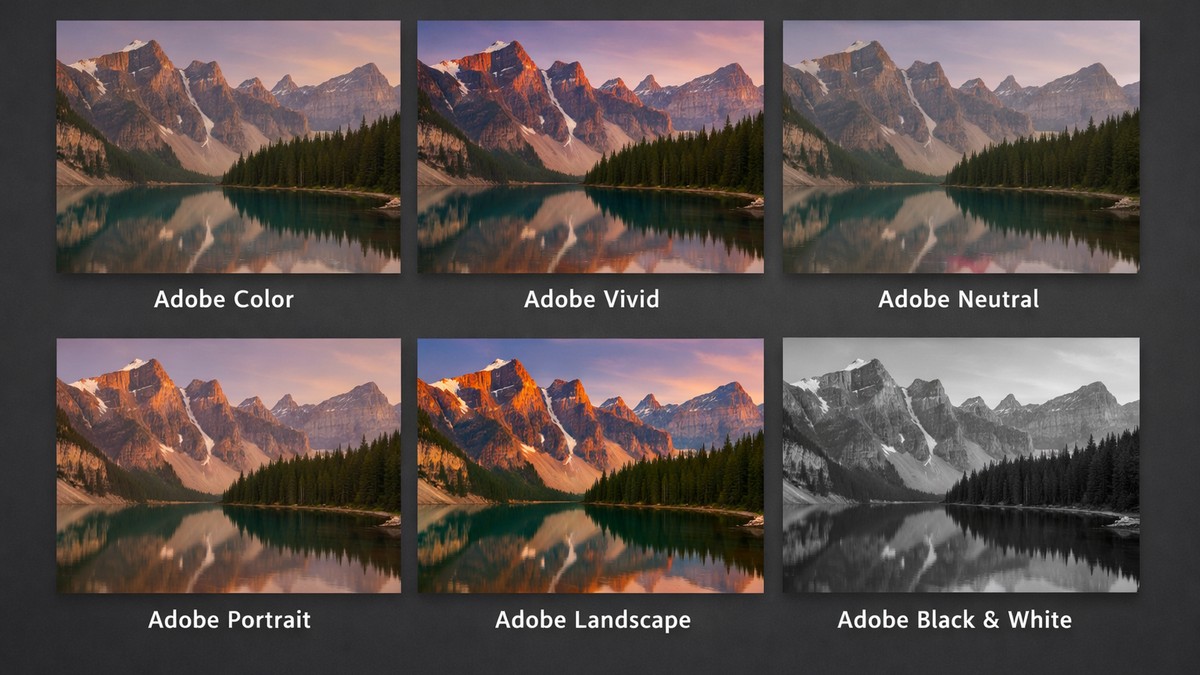
Try these first:
- Adobe Color – balanced and safe
- Adobe Portrait – great for people
- Adobe Neutral – best for heavy editing
Profiles change contrast and color behavior without damaging your image.
3. Turn On Lens Corrections Automatically
This is one of the easiest wins in Lightroom.
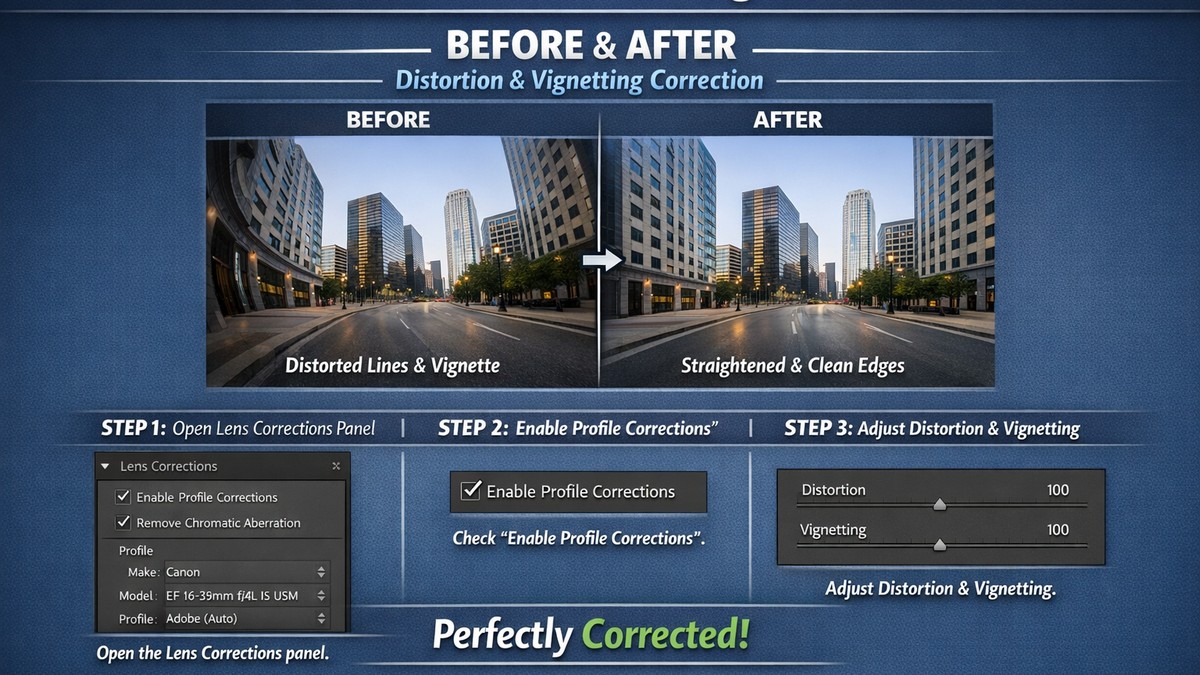
Enable:
- Remove Chromatic Aberration
- Enable Profile Corrections
It instantly fixes distortion, vignetting, and color fringing — no skill required.
4. Don’t Overuse Clarity
Clarity is powerful, but dangerous.
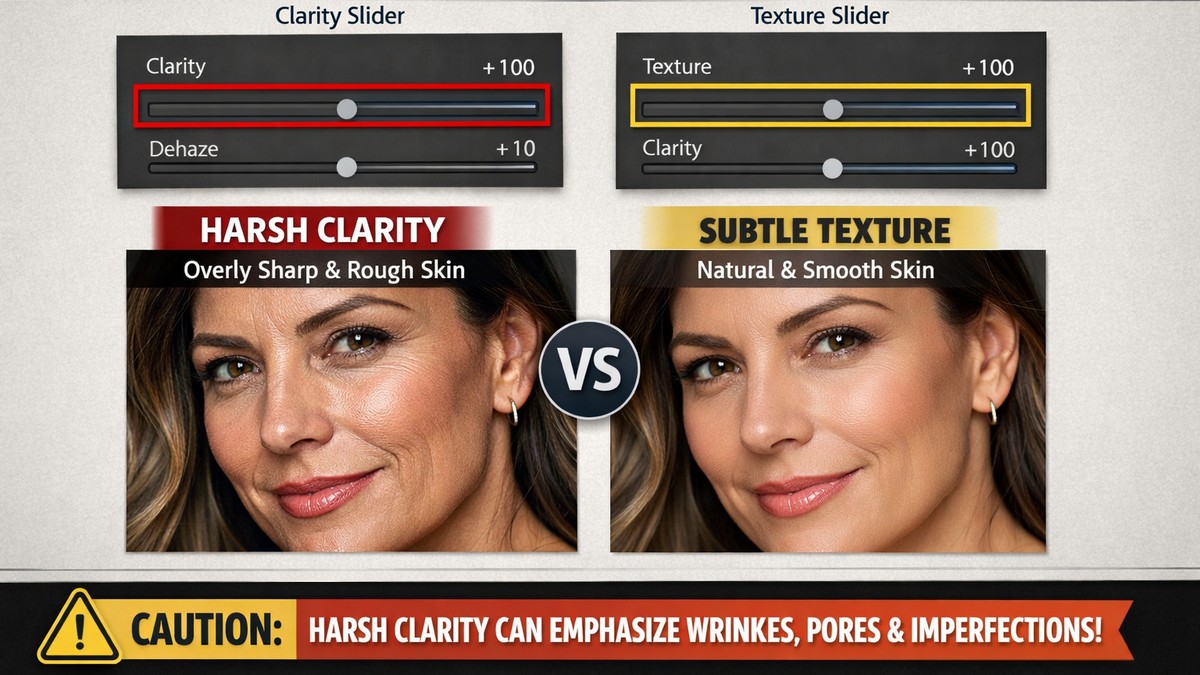
Too much clarity:
- ruins skin
- makes photos look harsh
- exaggerates noise
Beginner rule:
- use Texture first
- keep Clarity low or near zero
Subtle edits always look more professional.
5. Use Vibrance Instead of Saturation
If colors look dull, your instinct might be Saturation.
Resist it.
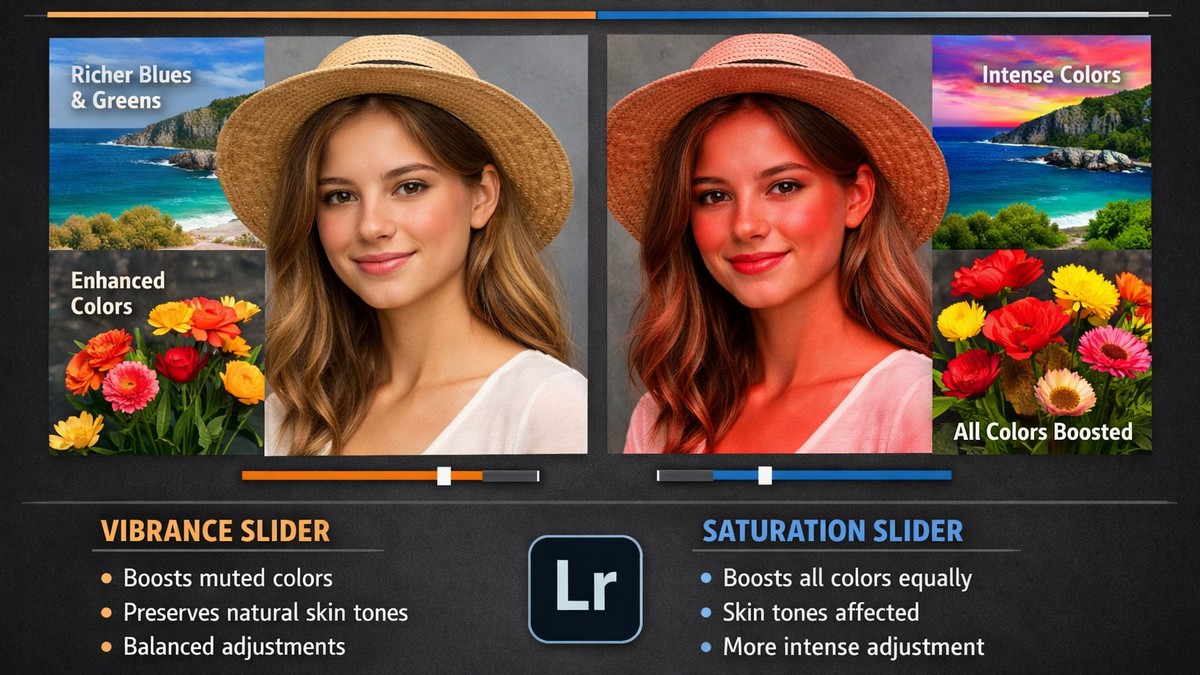
- Vibrance boosts muted colors safely
- Saturation boosts everything (including skin)
Most beginner-friendly edits use Vibrance and barely touch Saturation.
6. Fix White Balance Early
White balance controls the mood of your photo.
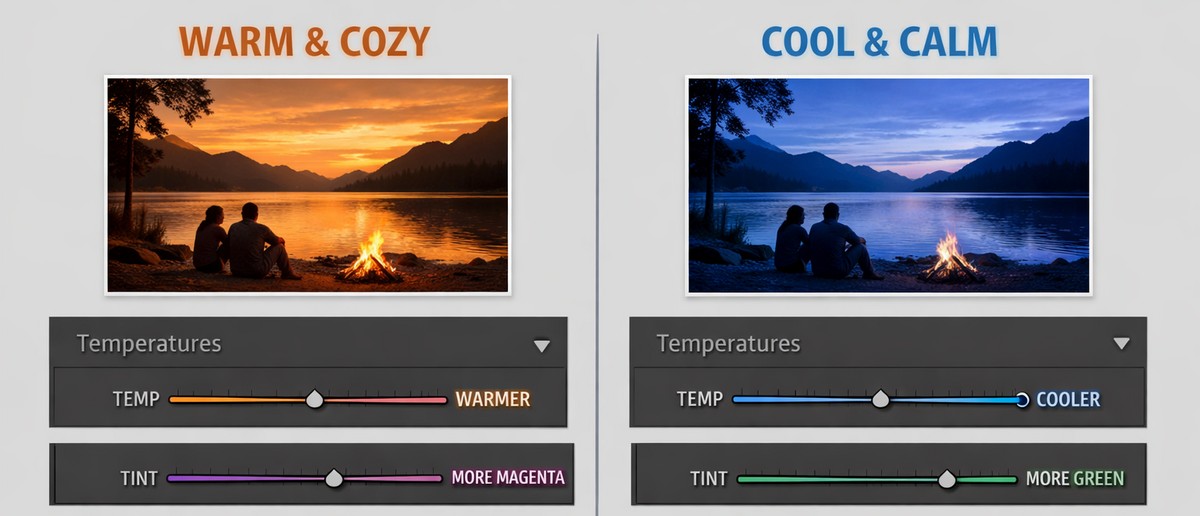
Simple rule:
- warm = cozy, emotional
- cool = clean, modern
Adjust white balance before judging colors.
If skin tones look wrong, white balance is usually the problem.
7. Use Presets as a Starting Point, Not a Final Edit
Presets are tools, not magic buttons.
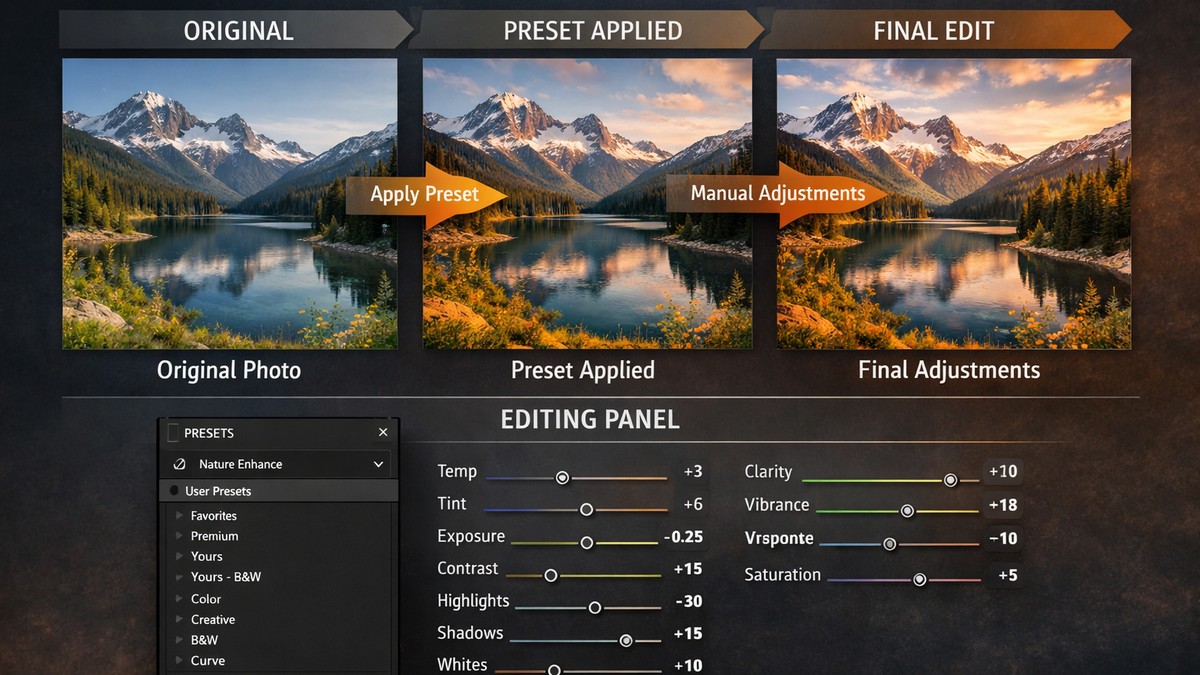
Best workflow:
- Fix exposure
- Apply preset
- Adjust white balance
- Fine-tune colors
Good presets speed up editing, but still need small tweaks.
8. Learn the Orange Color Channel (Especially for Skin)
Skin tones live mostly in the orange range.
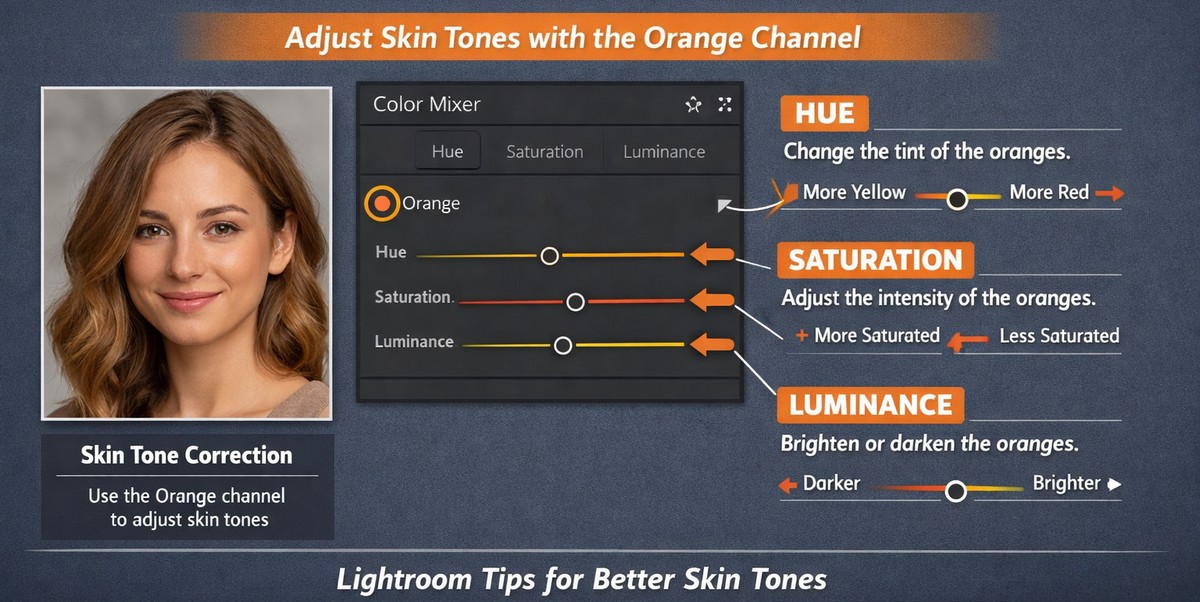
In the Color Mixer:
- slightly shift orange hue toward yellow
- reduce orange saturation a bit
- raise orange luminance for soft skin
This single adjustment improves portraits dramatically.
9. Use the Auto Button (Yes, Really)
“Auto” is much better than it used to be.
It:
- balances exposure
- protects highlights
- lifts shadows intelligently
Use Auto as a base, then refine manually.
It’s a time-saver, not a shortcut.
10. Add Contrast With Whites and Blacks

Beginners often overuse the Contrast slider.
Instead:
- push Whites slightly
- pull Blacks slightly
This creates depth without destroying midtones.
11. Keep Grain Subtle (or Skip It)
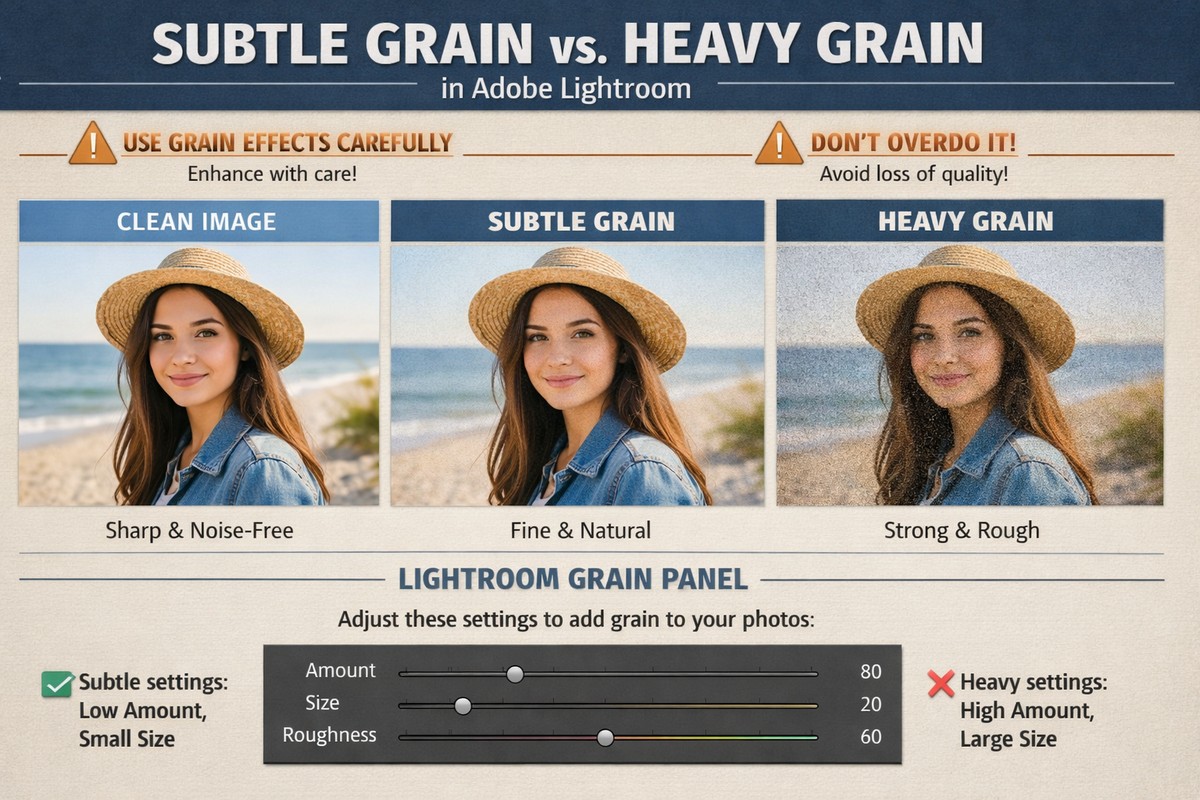
Grain can add character — or destroy an image.
Beginner advice:
- add grain only if it supports the mood
- keep it subtle
- avoid heavy grain on sharp digital photos
If you’re unsure, leave grain out.
12. Use Masking for Small Fixes
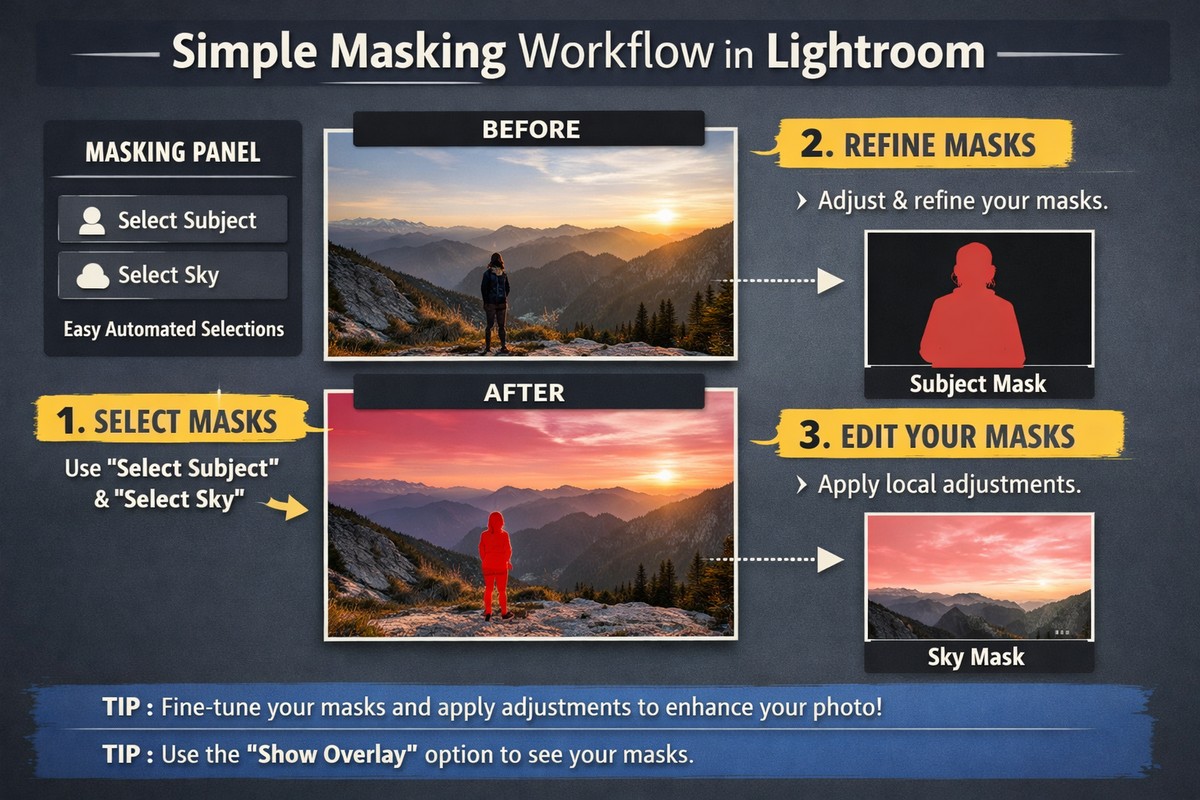
Masking is one of Lightroom’s most powerful features.
Easy beginner uses:
- Select Subject → brighten faces
- Select Sky → recover highlights
- Brush → fix small shadows
You don’t need Photoshop for clean results anymore.
13. Don’t Sharpen Everything
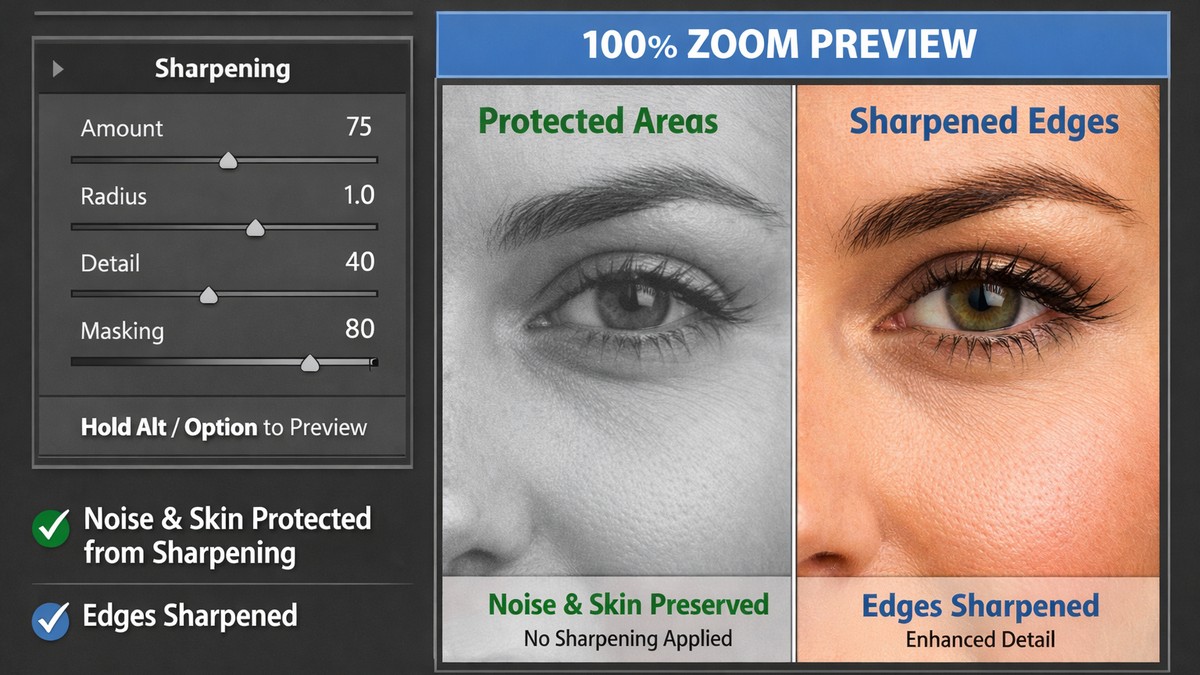
Sharpening mistakes are very common.
Good beginner settings for RAW:
- Amount: 40–70
- Masking: 60–90
High masking prevents sharpening skin and noise.
Always zoom to 100% when sharpening.
14. Keep Your Edits Consistent
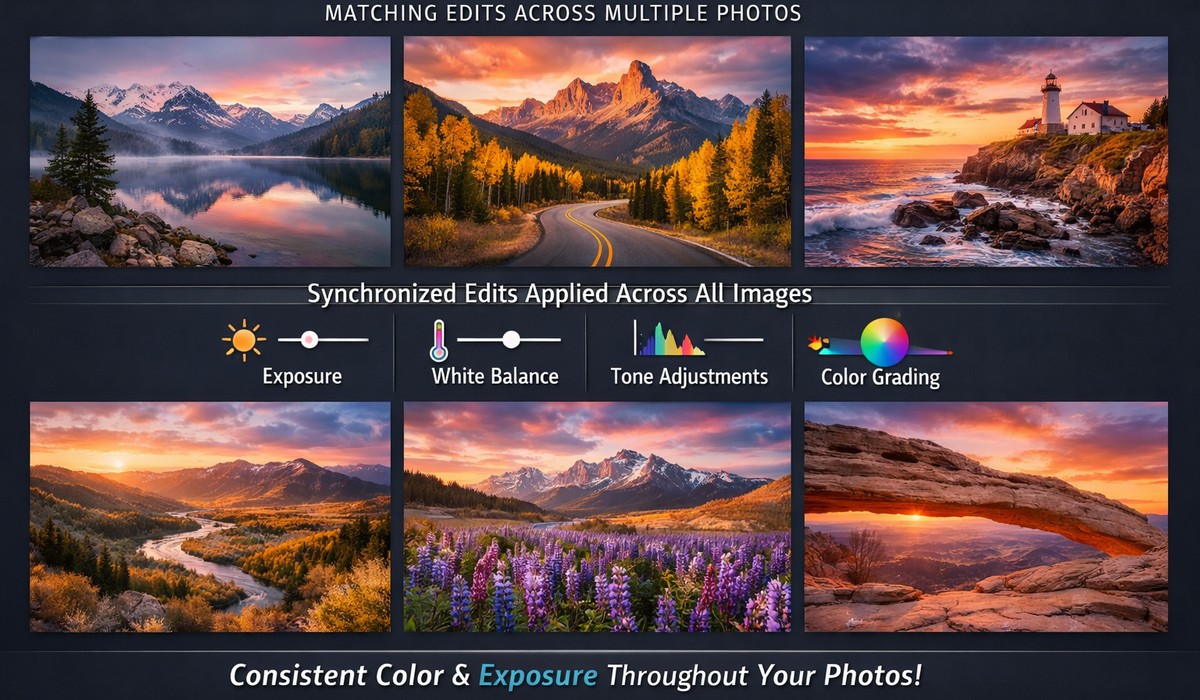
Professional-looking photos are consistent, not extreme.
Tips:
- use the same preset for a set
- sync settings between similar photos
- avoid changing style mid-gallery
Consistency matters more than perfection.
15. Export Settings Matter More Than You Think

A great edit can look terrible with wrong export settings.
For web & social media:
- JPEG
- sRGB
- Quality: 80–85
- Long edge: 2048–3000px
For print:
- full resolution
- maximum quality
- correct color profile
Exporting is part of editing — not an afterthought.
Common Beginner Mistakes to Avoid
If your edits don’t look right, it’s usually because of one of these:
- too much saturation
- heavy clarity
- incorrect white balance
- crushed blacks
- blown highlights
- extreme presets without adjustment
Clean edits always age better.
Lightroom Desktop vs Mobile for Beginners
Both are great, but serve different purposes.
Desktop:
- better for RAW files
- more control
- ideal for learning fundamentals
Mobile:
- fast
- simple
- perfect for social media
Many beginners start on mobile and move to desktop later.
Final Thoughts: Simple Edits Win Every Time
You don’t need advanced techniques to get good at Lightroom.
You need a simple, repeatable approach:
- Fix exposure
- Set white balance
- Adjust colors gently
- Sharpen carefully
- Stay consistent
Master these basics, and your photos will already look better than most.
LIGHTROOM PRESETS
If you want to level up your photo editing and color grading, I’ve put together a page with my favorite presets — the ones that actually work — plus exclusive discounts. Open it in a new tab and save it for later, so you always have a go-to place for reliable tools and inspiration.
FIND YOUR STYLE