How to Make Skin Look Smooth in Lightroom (Natural & Realistic)
Smooth skin is one of the most requested results in portrait editing — and also one of the easiest ways to ruin a photo. Overdone skin smoothing makes faces look plastic, flat, and unnatural. Good skin retouching is subtle. You should feel the difference, not immediately see it. This guide shows you how to make skin look smooth in Lightroom using clean, natural techniques that preserve texture, detail, and realism.
No Photoshop required. Everything here works directly inside Lightroom and is beginner-friendly.
LIGHTROOM PRESETS
If you want to level up your photo editing and color grading, I’ve put together a page with my favorite presets — the ones that actually work — plus exclusive discounts. Open it in a new tab and save it for later, so you always have a go-to place for reliable tools and inspiration.
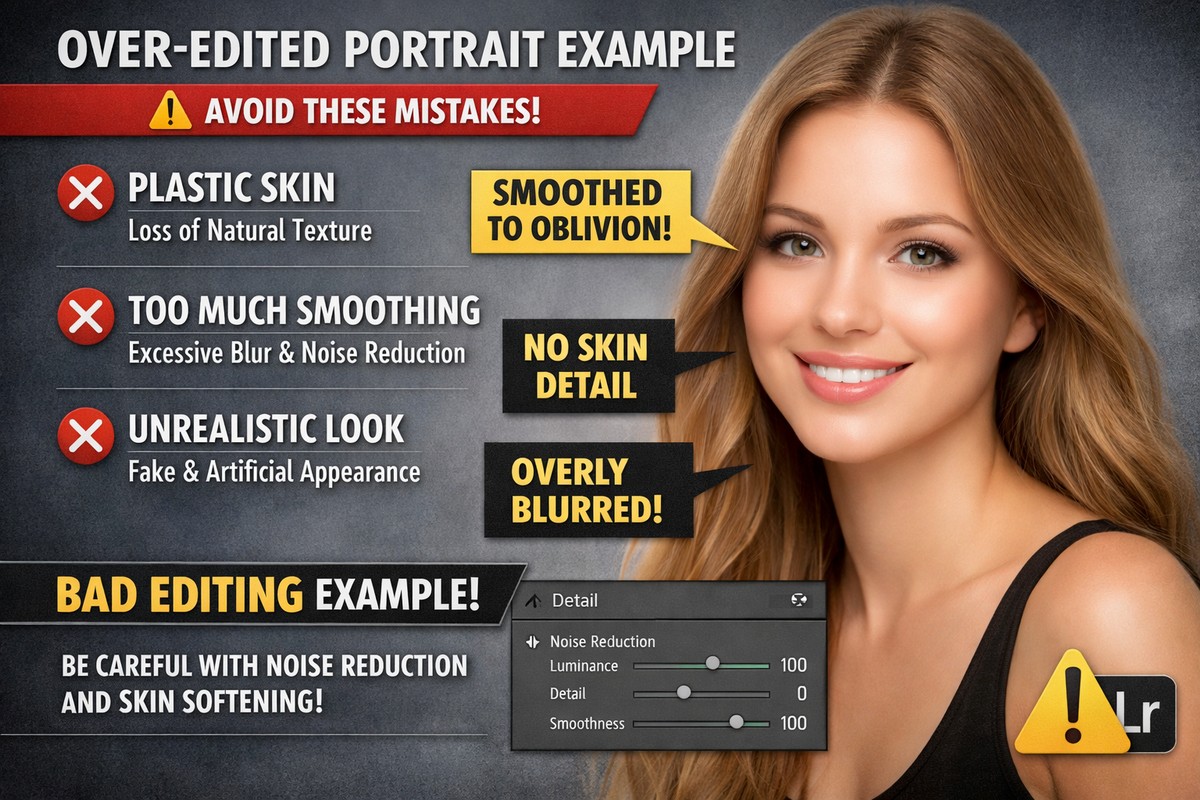
START EDITING BETTERWhy Skin Smoothing Often Goes Wrong
Before learning how to smooth skin correctly, it’s important to understand common mistakes.
Most beginners:
- use too much Clarity reduction
- blur the entire face
- overuse Noise Reduction
- remove all skin texture
- apply global adjustments instead of local ones
Professional skin retouching is about reducing distractions, not erasing texture.
The Golden Rule of Skin Retouching in Lightroom
If you remember one thing, remember this:
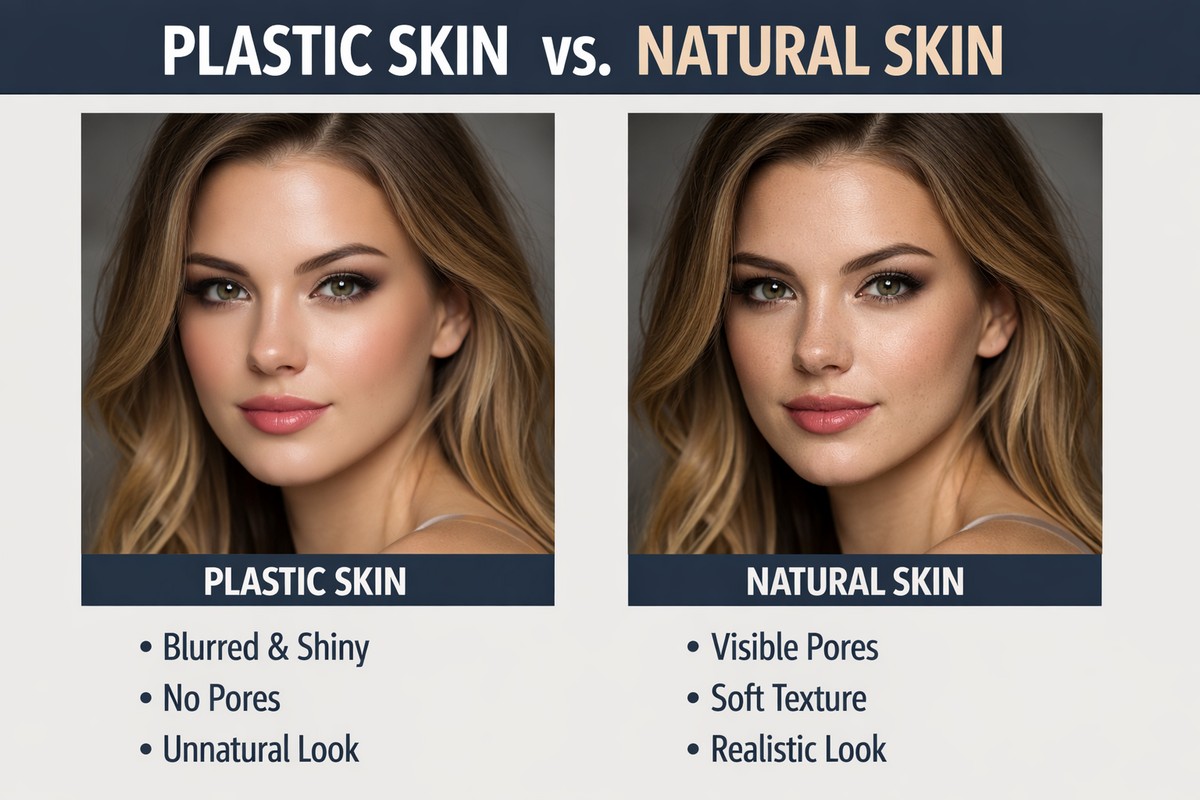
Smooth skin ≠ blurred skin
Good skin:
- keeps pores visible
- keeps natural shadows
- keeps highlights intact
- removes harsh texture and uneven tones only
Lightroom is perfect for this kind of subtle correction.
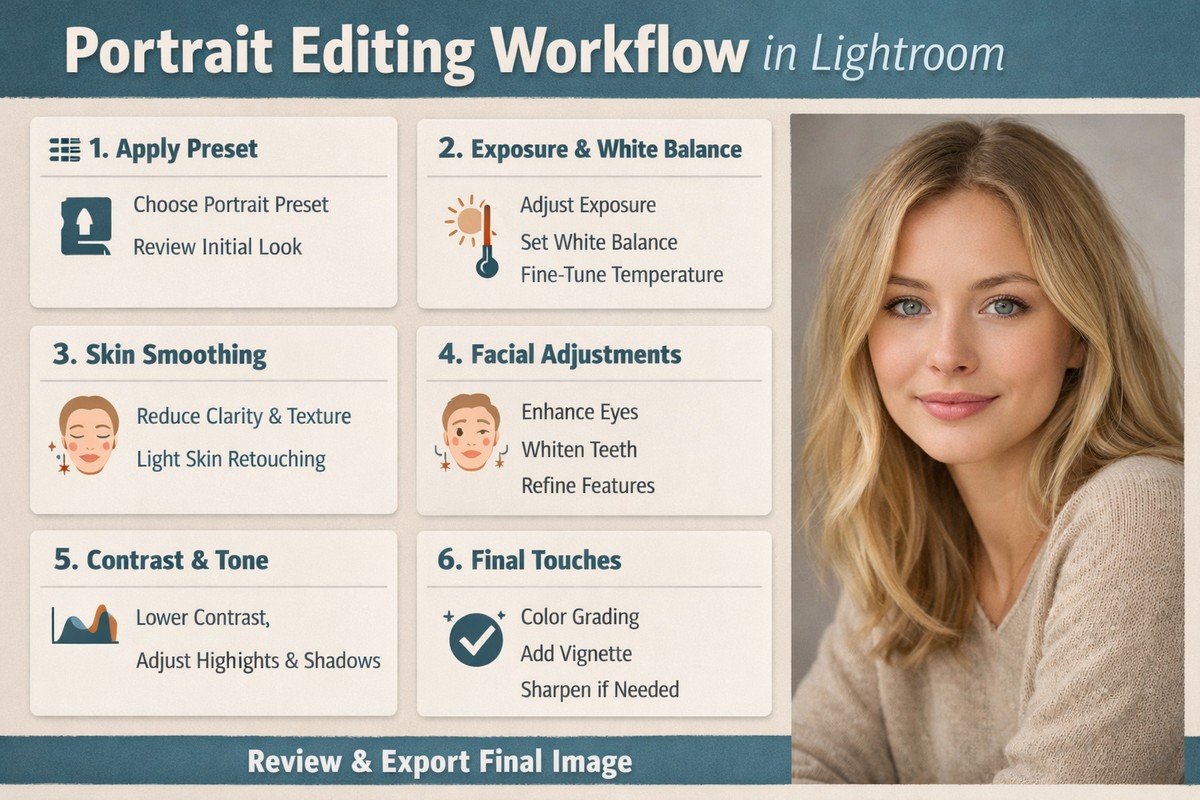
Step 1: Start With a Clean Base Edit
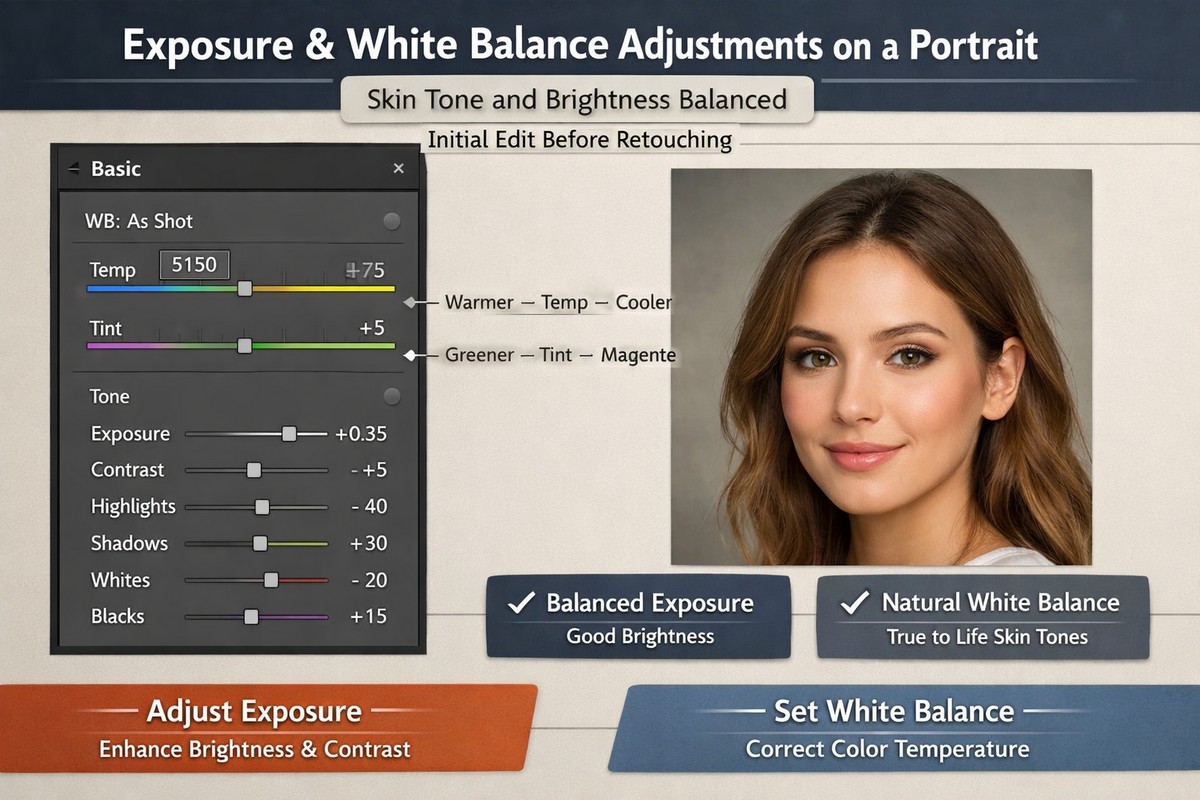
Never retouch skin on a badly edited photo.
Before touching skin:
- fix exposure
- correct white balance
- adjust contrast
- apply your preset (if you use one)
Skin reacts differently depending on exposure and color balance.
LIGHTROOM PRESETS
If you want to level up your photo editing and color grading, I’ve put together a page with my favorite presets — the ones that actually work — plus exclusive discounts. Open it in a new tab and save it for later, so you always have a go-to place for reliable tools and inspiration.
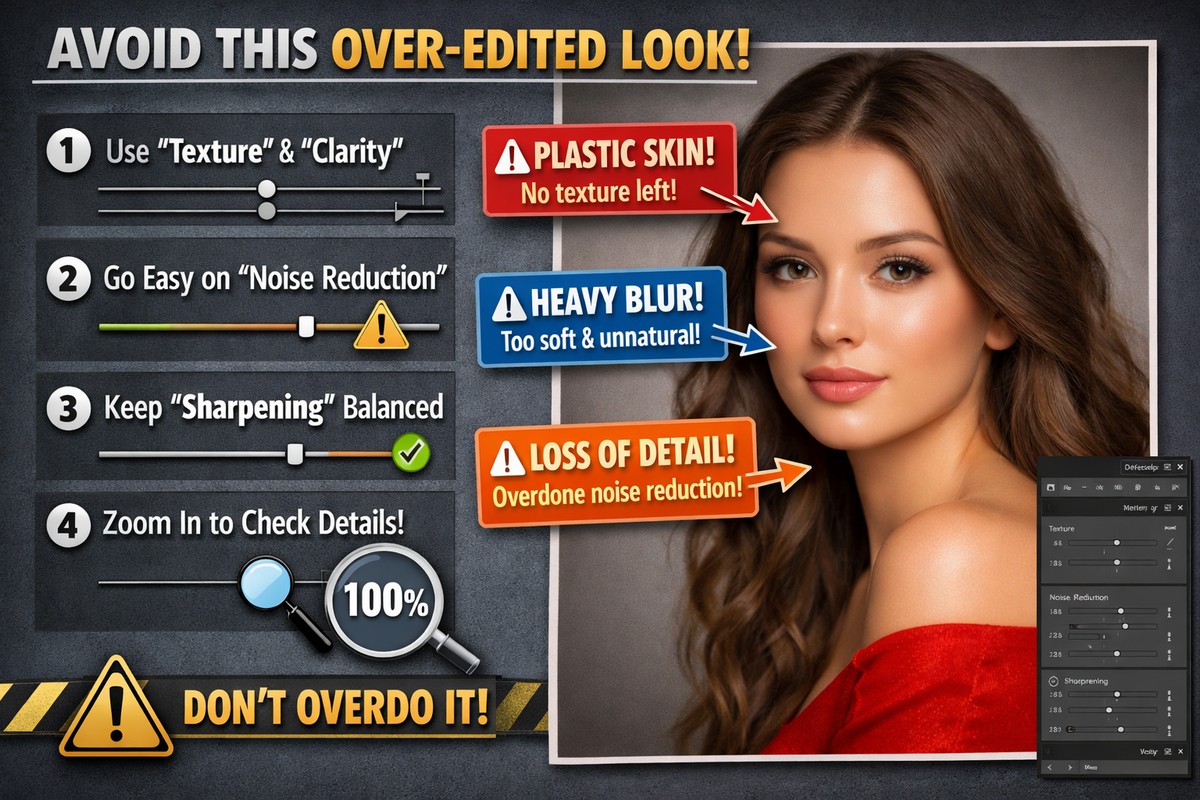
START EDITING BETTERStep 2: Use Texture, Not Clarity (This Is Critical)
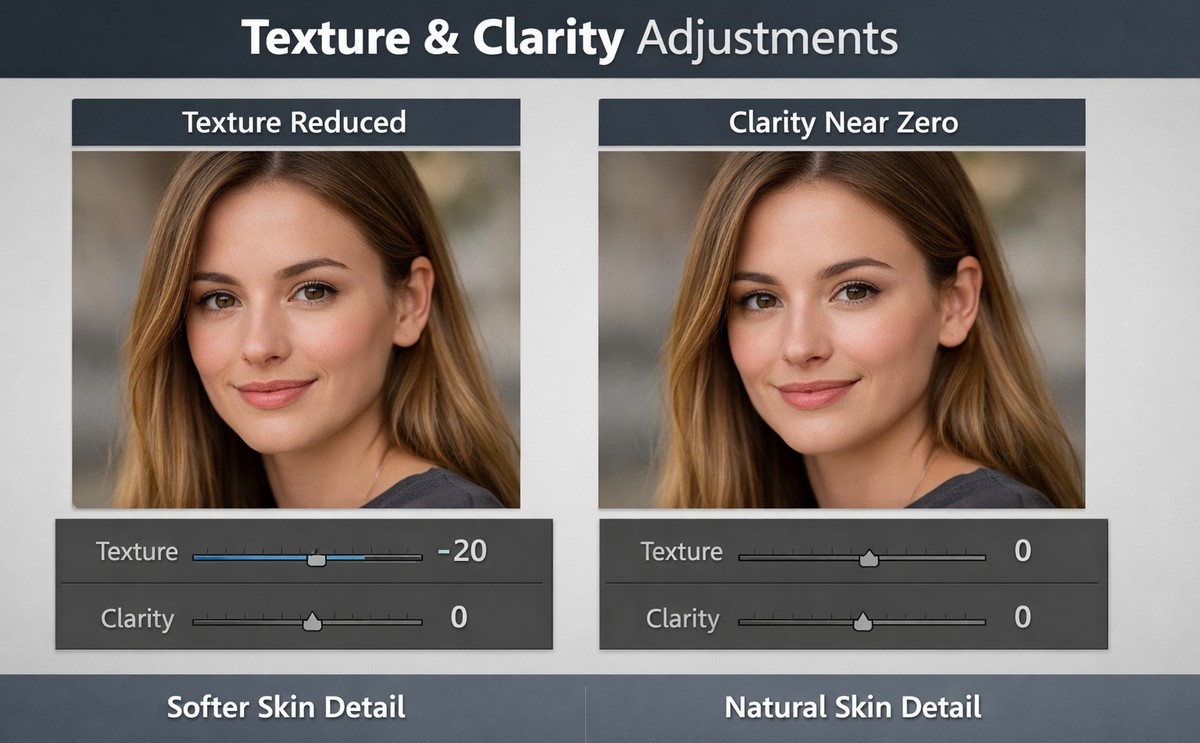
This is the most important Lightroom tip for smooth skin.
Texture
- affects fine details
- ideal for skin smoothing
- preserves edges and structure
Clarity
- affects midtone contrast
- easily creates harsh skin
- should be used carefully
Beginner rule:
- lower Texture slightly
- avoid heavy Clarity reduction
Typical starting point:
- Texture: –10 to –25
- Clarity: 0 to –5
Step 3: Never Smooth Skin Globally
Global skin smoothing is the fastest way to ruin a portrait.
Instead, always use masking.
Lightroom offers several powerful masking tools that make skin retouching easy and precise.
Step 4: Use Select Subject for Fast Skin Smoothing
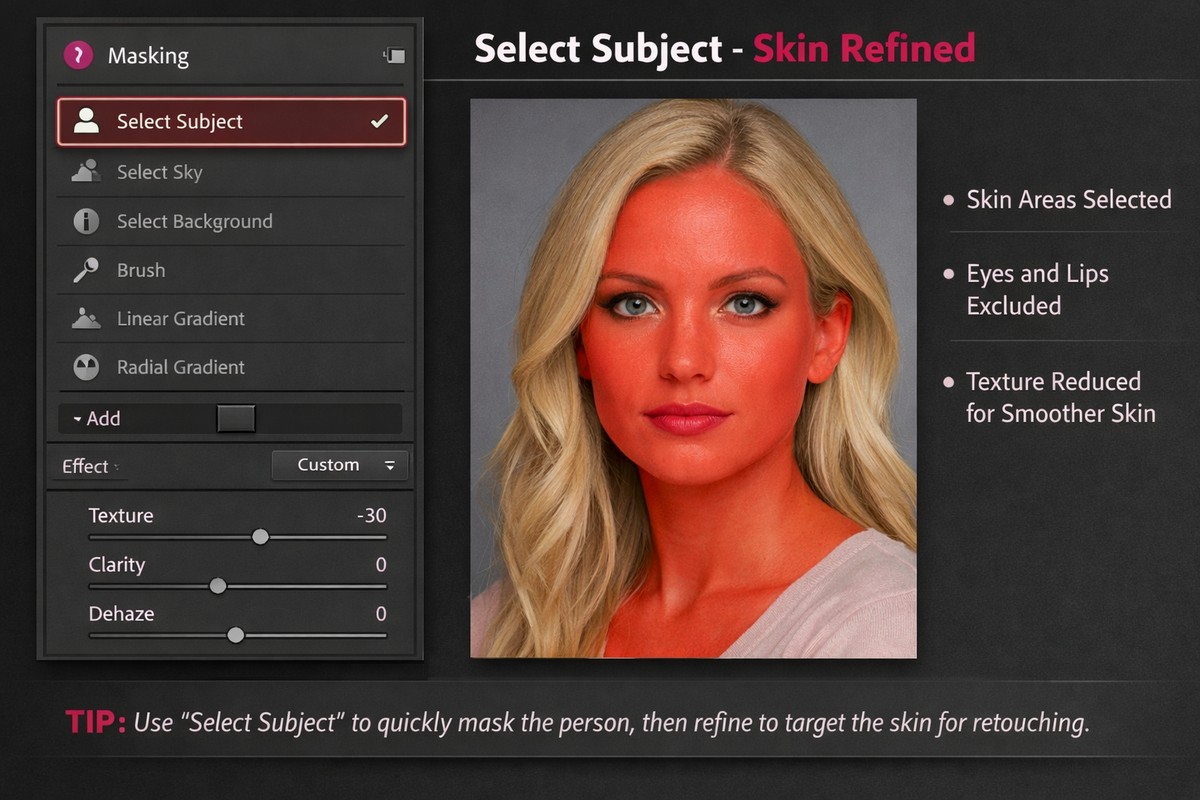
Select Subject is perfect for beginners.
Workflow:
- Open Masking
- Click Select Subject
- Refine the mask (remove eyes, lips, hair if needed)
Once the mask is active:
- reduce Texture
- slightly reduce Clarity
- adjust Exposure if needed
This instantly softens skin while keeping facial structure intact.
Step 5: Refine Skin With a Brush Mask
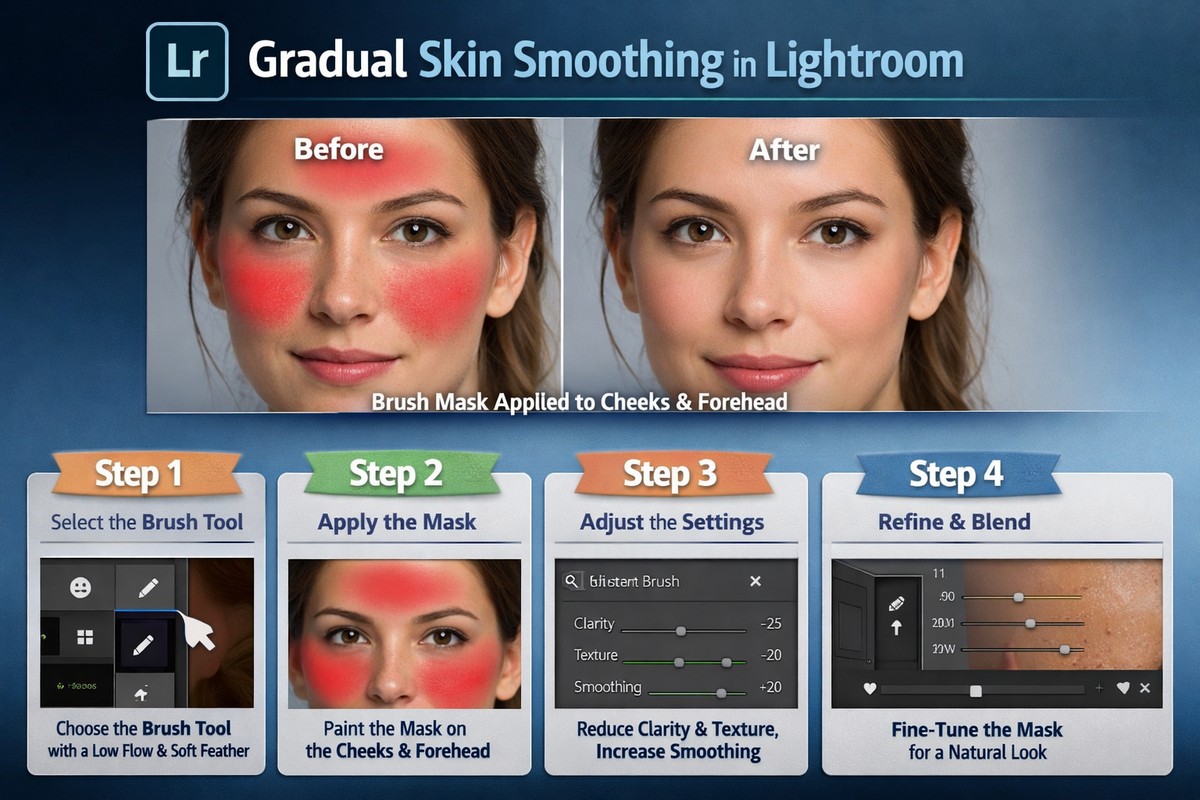
For more control, use the Brush tool.
Use it to:
- smooth cheeks
- soften forehead texture
- reduce harsh shadows
- avoid eyes, eyebrows, lips
Recommended brush settings:
- low Flow
- soft Feather
- gradual strokes
Subtle passes always look better than strong single strokes.
Step 6: Use Color Mixer to Improve Skin Tone
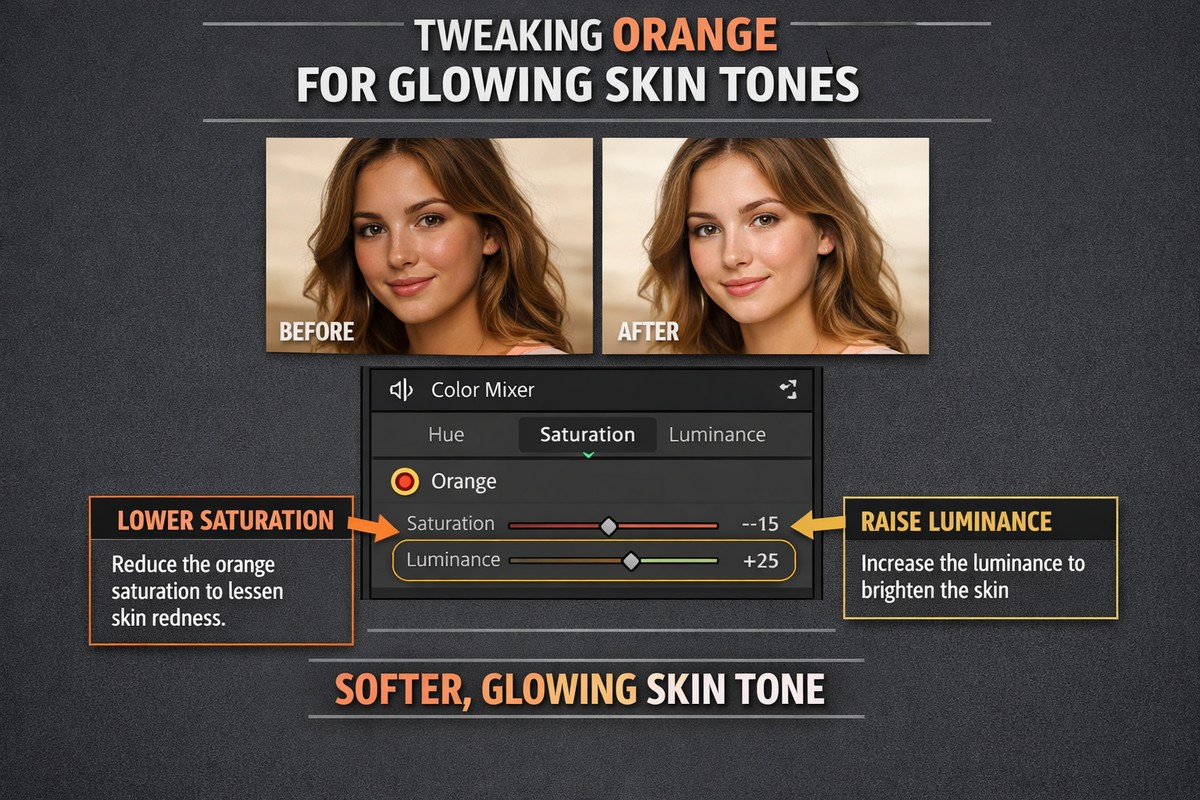
Smooth skin is also about even color, not just texture.
Most skin tones live in:
- orange
- red
In the Color Mixer:
- reduce orange saturation slightly
- increase orange luminance gently
- shift orange hue toward yellow if skin looks red
This evens out blotchy areas and creates a natural glow.
Step 7: Fix Redness Without Killing Skin Color

Redness is one of the most common portrait issues.
To fix it:
- lower red saturation slightly
- increase red luminance a bit
- avoid extreme hue shifts
Never remove all red — skin needs warmth to look alive.
Step 8: Use Masks to Even Out Highlights and Shadows
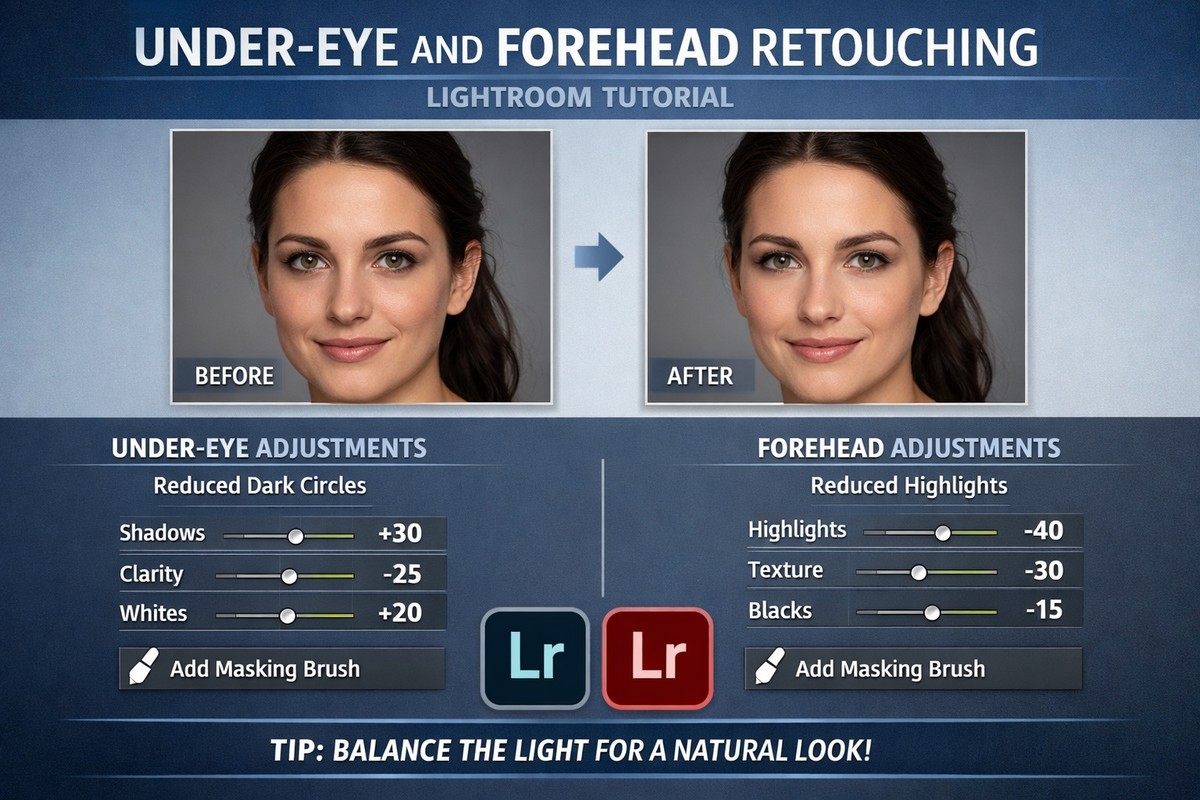
Uneven lighting makes skin look rough.
With masking, you can:
- lift shadows under eyes
- soften harsh highlights on forehead
- balance light across the face
Use small exposure changes:
- +0.10 to +0.30
- –0.10 to –0.30
Micro-adjustments matter.
Step 9: Don’t Overuse Noise Reduction
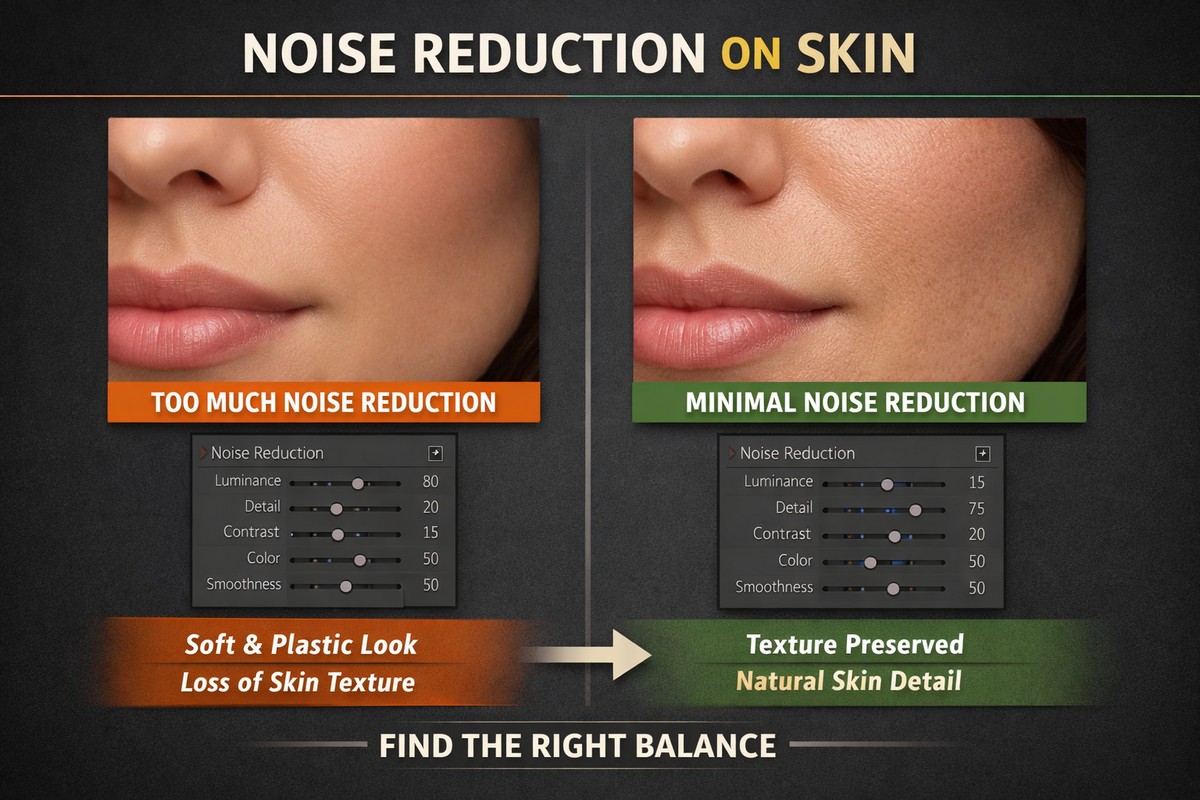
Noise Reduction is not a skin smoothing tool — but beginners often use it that way.
Too much Noise Reduction:
- destroys texture
- creates waxy skin
- blurs fine detail
If needed:
- apply minimal Luminance Noise Reduction
- only after texture adjustments
Noise Reduction should be the last resort, not the main tool.
Step 10: Sharpen Smart, Not Hard
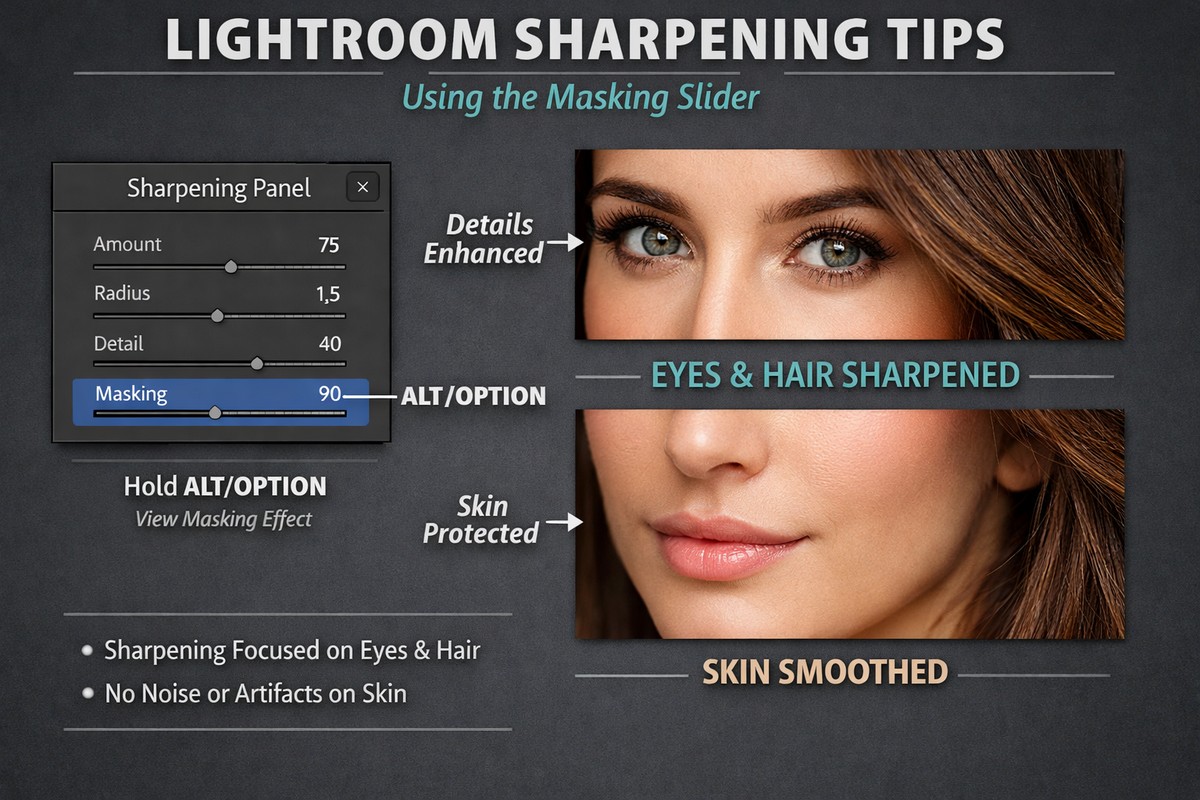
Sharpening affects skin more than people realize.
For portraits:
- lower sharpening amount
- increase masking
Suggested starting point:
- Amount: 40–60
- Masking: 70–90
This sharpens eyes and hair, not skin.
Step 11: Check Before and After (Often)
One of the best habits you can develop:
- toggle the mask on and off
- compare before and after
- zoom in and zoom out
If skin looks fake at 100%, it will look worse on larger screens.
Step 12: Keep Skin Texture Real
Professional portraits always retain:
- pores
- fine lines
- natural variation
Your goal is clean skin, not perfect skin.
If the subject no longer looks human — you went too far.
Step 13: Use Presets Carefully on Skin
Some presets are too aggressive for portraits.
If a preset:
- adds strong contrast
- pushes clarity
- oversaturates colors
…always adjust it before skin retouching.
Good portrait presets:
- keep skin tones neutral
- avoid harsh contrast
- are easy to dial back
Step 14: Skin Smoothing on Mobile Lightroom
Lightroom Mobile works surprisingly well for skin retouching.
Best mobile tools:
- Texture slider
- Brush masking
- Color Mix (orange & red channels)
Mobile rule:
- even more subtle than desktop
- small screens hide mistakes
Common Skin Retouching Mistakes to Avoid

If your portraits don’t look right, check for these:
- skin looks plastic
- pores completely gone
- face brighter than surroundings
- unnatural color shifts
- eyes softened accidentally
- heavy blur instead of texture control
Most mistakes come from doing too much.
Lightroom vs Photoshop for Skin Smoothing
Lightroom:
- fast
- natural
- beginner-friendly
- perfect for most portraits
Photoshop:
- advanced retouching
- frequency separation
- heavy beauty work
For 90% of portraits, Lightroom is more than enough.
Final Thoughts: Natural Skin Always Wins
Smooth skin is not about hiding reality — it’s about reducing distractions. When done right, viewers don’t notice the retouching. They just see a clean, flattering portrait.
If you follow a simple approach:
- subtle texture reduction
- local adjustments only
- careful color control
- realistic sharpening
…your portraits will instantly look more professional.
LIGHTROOM PRESETS
If you want to level up your photo editing and color grading, I’ve put together a page with my favorite presets — the ones that actually work — plus exclusive discounts. Open it in a new tab and save it for later, so you always have a go-to place for reliable tools and inspiration.
START EDITING BETTER

