Essential Lightroom Photography Tips for Stunning, Consistent Edits
If you want your photos to look polished and professional, Lightroom is the editor that gets you there. It’s powerful, beginner-friendly, and full of tools that can transform a flat RAW file into a vibrant, eye-catching image. But most photographers only scratch the surface of what Lightroom can actually do. In the sections below, you’ll find practical Lightroom tips professionals use every day to edit faster, stay consistent, and get clean, natural-looking results in real-world shooting conditions.
This guide breaks down practical, real-world Lightroom tips—the kind professionals use every day to edit faster, develop consistent style, and bring out the best in their photos. Whether you’re shooting portraits, landscapes, lifestyle content, or product photos, these techniques will immediately upgrade your workflow.
LIGHTROOM PRESETS
If you want to level up your photo editing and color grading, I’ve put together a page with my favorite presets — the ones that actually work — plus exclusive discounts. Open it in a new tab and save it for later, so you always have a go-to place for reliable tools and inspiration.
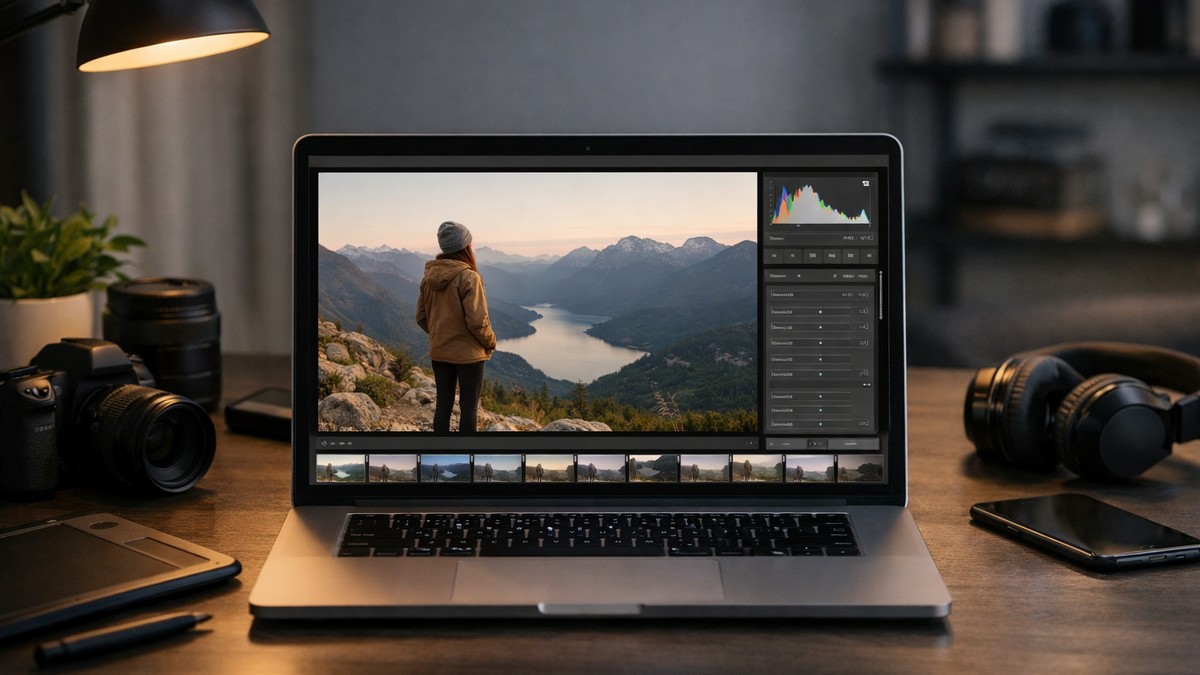
TAKE A LOOKWhy Lightroom Is the Foundation of Modern Photography
Lightroom is more than an editor — it’s a complete workflow environment. You can organize, color grade, retouch, compare edits, sync adjustments, and build your recognizable style all in one place.
The real strength of Lightroom lies in three things:
• non-destructive editing
• powerful color controls
• streamlined batch editing
You don’t just fix photos here. You craft your visual identity.
Start With a Proper RAW Workflow
Every great Lightroom edit starts before you even touch a slider. Your imported RAW files set the foundation.

Shoot in RAW (Always, Unless Impossible)
RAW captures more dynamic range, more color data, and more detail. JPEG throws most of that away. Lightroom’s tools were built for RAW.
If you want flexibility in editing, RAW is the only way.
Use Camera Profiles Before Anything Else
Most beginners skip camera profiles entirely, but they dramatically influence:
• color
• contrast
• tone response
Try these before editing:
• Adobe Color
• Adobe Portrait
• Camera Standard
• Camera Neutral
• Camera Landscape
They change the base look of your file and can even prevent over-editing later.
Start With Lens Corrections
Turn on:
• Remove Chromatic Aberration
• Enable Profile Corrections
This fixes distortion, color fringing, vignetting — issues that are better resolved before color grading.
Master Exposure and Contrast for Clean, Professional Edits
Lightroom gives you multiple exposure tools — but not all of them behave the same.

Exposure = Overall Brightness
Use it to set the global level of your image.
Highlights = Recover Bright Areas
Perfect for skies, white clothing, shiny objects.
Shadows = Lift Details
A clean way to brighten dark areas without flattening the image.
Whites & Blacks = Final Contrast Control
These push dynamic range without destroying midtones.
Use «Auto» Exposure as a Starting Point (Not a Final Edit)
“Auto” is surprisingly intelligent in 2025.
It gives you:
• balanced exposure
• recovered highlights
• lifted shadows
Then you refine the creative part manually.
Color Grading Like a Pro — The Real Secret to Style
Most photographers underestimate how powerful Lightroom’s color tools really are.
This is where your personal style is built.
Tip 1: Use HSL to Control Every Color Separately
HSL (Hue, Saturation, Luminance) allows extremely precise adjustments.
Examples:
• shift orange hue slightly toward yellow → warm skin tones
• darken blue luminance → deeper skies
• desaturate green hues → moody vibe
• lift red luminance → soft, natural lips in portraits
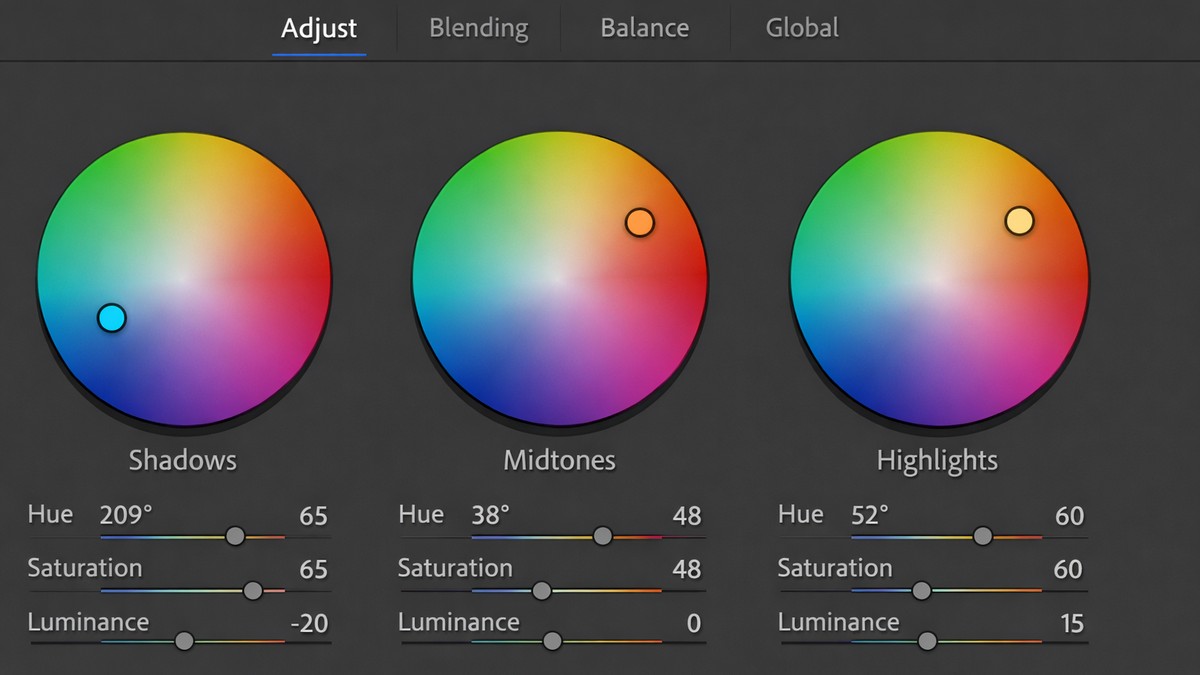
Tip 2: Use Color Grading (Three-Way Wheels)
Split toning used to be limited.
Color Grading offers:
• shadows color
• midtones color
• highlights color
• global tint
• blending
• balance
You can create film looks, cinematic tones, warm vibes, or modern workflows instantly.
Tip 3: Calibration — Your Hidden Superpower
Calibration is the engine behind many professional presets.
It affects:
• deep color tonality
• cross-channel separation
• film-like palettes
Small moves here = dramatic shifts in mood.
Build a Clean Editing Workflow You Can Repeat Every Time
The best edits come from consistency. Professionals don’t reinvent the wheel for each photo — they follow a repeatable sequence.
Step 1: Correct Exposure
Fix the basics before touching style.
Step 2: Adjust White Balance
WB shapes the emotion of your image.
Cool = modern
Warm = nostalgic
Neutral = clean
Step 3: Apply Your Preset (If You Use Them)
Presets accelerate the process, not replace skill.
COMMENT: INSERT INTERNAL CTA → Your “Best Lightroom Presets” Page
Step 4: Fine-Tune HSL
This is where style is polished.
Step 5: Control Contrast With Tone Curve
Tone curves add visual depth that basic sliders can’t replicate.
Step 6: Add Sharpening
Amount: 40–70 for RAW
Masking: 50–90 for portraits (to avoid sharpening skin)
Step 7: Add Grain Only If It Improves the Photo
Subtle grain creates character.
Harsh grain ruins clarity.
Tone Curve Tips That Make Your Edits Look More Professional
The tone curve is one of the most feared — and misunderstood — tools.
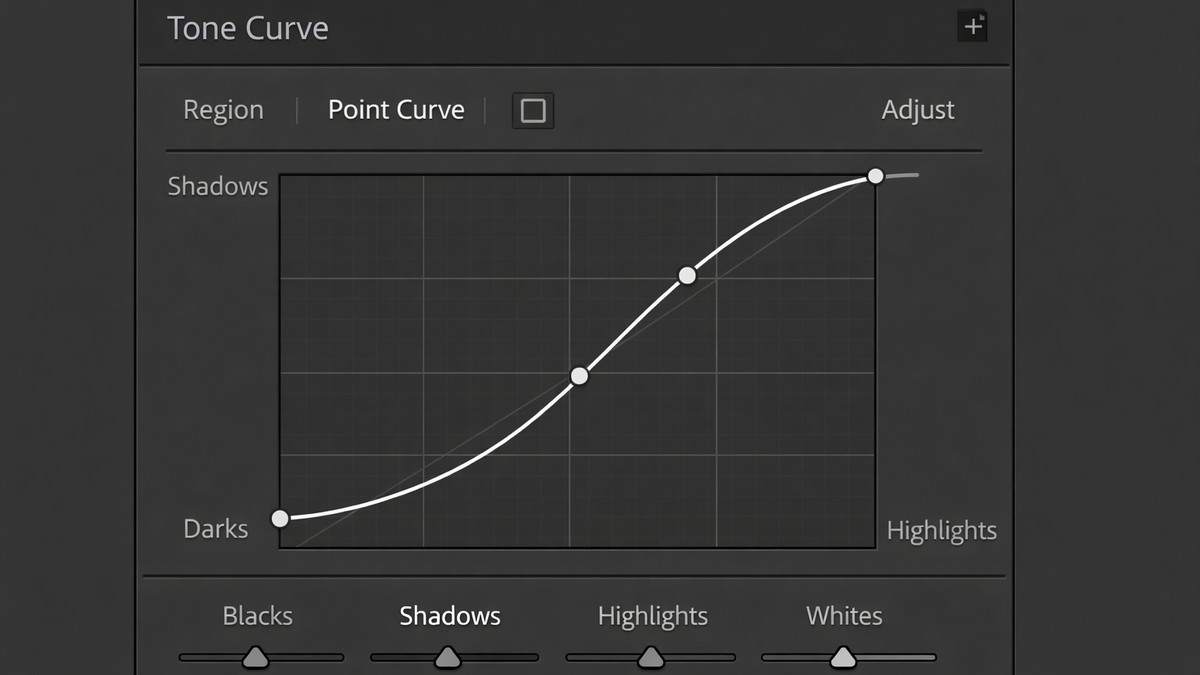
But mastering it puts you ahead of 90% of photographers.
Tip 1: Start With a Gentle S-Curve
Adds contrast without making shadows muddy.
Tip 2: Lift the Shadows for Film Look
Just a little. Too much = washed out.
Tip 3: Keep Highlights Smooth
Film never has harsh, clipped highlights.
Tip 4: Use RGB Curves for Creative Color
Blue curve → warm/cool split
Red curve → tone skin
Green curve → film softness
Lightroom Tips for Perfect Skin Tones (Beginner-Friendly)
Skin tones are the hardest part of editing. And Lightroom gives you fine control — if you know where to look.
Use the Orange HSL Panel
• Hue: shift toward yellow for natural, warm skin
• Saturation: reduce slightly to avoid oversaturation
• Luminance: lift for soft, glowing tones
Use Color Mixer for Micro-Corrections
This helps isolate problem areas like red cheeks or sunburn.
Avoid Oversharpening
Sharpen masking should always be high for portraits.
Use the Brush Tool for Precision
Brush can fix:
• under-eye shadows
• uneven highlights
• redness
• patchy lighting
Lightroom Tips for Mobile Photographers
Lightroom Mobile is powerful — more than most people realize.

Tip 1: Use Profiles, Not Just Presets
Profiles create stronger style while keeping flexible sliders.
Tip 2: Reduce Noise Carefully
Phone sensors struggle in low light.
Use noise reduction gently — too much blurs details.
Tip 3: Use the “Amount” Slider on Presets
Perfect for subtle, natural edits.
Tip 4: Increase Texture, Decrease Clarity
Texture improves detail.
Clarity can distort faces.
Masking Tools — Lightroom’s Most Powerful Upgrade
Masking changed everything. It allows selective adjustments previously possible only in Photoshop.
Use “Select Subject” for Portraits
Fix shadows, add light, soften backgrounds.
Use “Select Sky” for Landscapes
Recover sky detail without affecting the whole image.
Use “Brush” for Micro Edits
Perfect for:
• acne
• stray shadows
• clothing highlights
• reflections
Batch Editing Tips for Faster Workflow
Speed matters — especially for client projects.
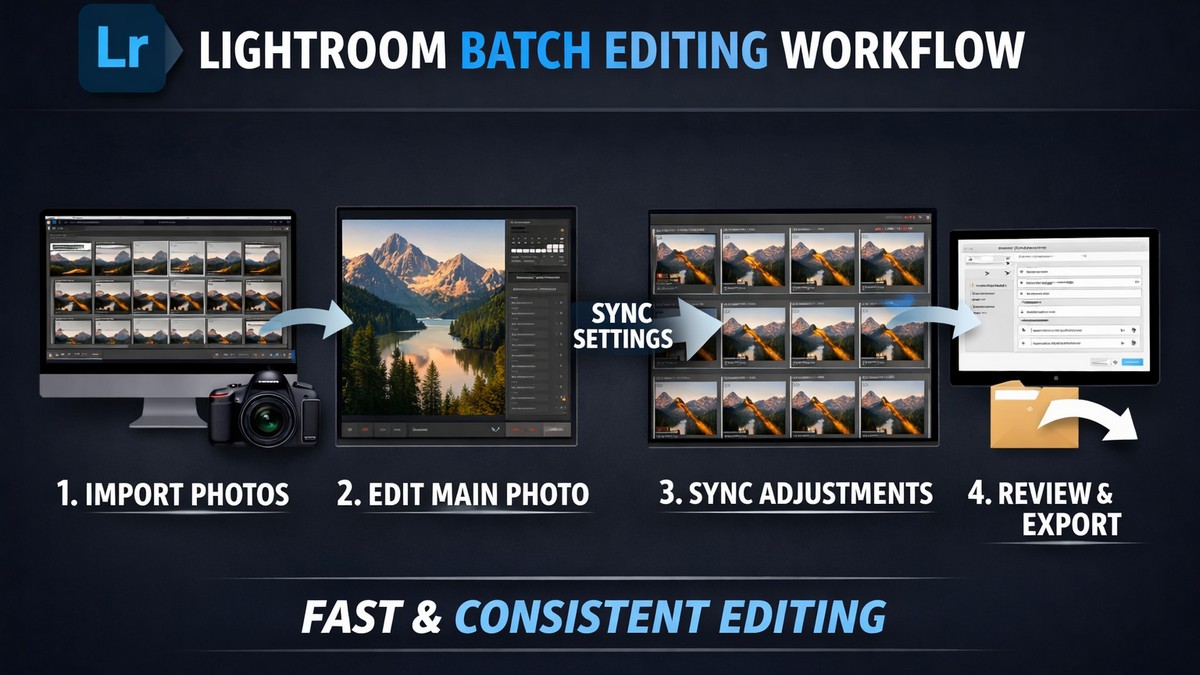
Tip 1: Sync Only the Sliders You Need
Avoid syncing:
• exposure
• white balance
Tip 2: Use “Previous” for Similar Shots
Saves time when shooting sequences.
Tip 3: Build Presets From Your Best Edits
Create your own presets for a consistent brand style.
Avoid These Common Lightroom Editing Mistakes
Most beginners over-edit because they try too hard.
Professional editing is subtle.
Mistake 1: Oversaturating Colors
This screams “beginner.”
Mistake 2: Pushing Clarity Too High
Clarity breaks skin and textures.
Mistake 3: Blowing Out Whites
Pure white is good — clipped white is not.
Mistake 4: Insane Grain
Keep grain believable.
Mistake 5: Skipping Calibration
You lose access to film-like palettes.
Final Thoughts — Lightroom Is a Tool for Style, Not Just Editing
Lightroom is where good photos become great photos.
But the goal isn’t to copy someone else’s style — it’s to find your own voice through consistent, thoughtful editing.
A strong workflow includes:
• clean exposure
• balanced colors
• subtle contrast
• gentle sharpening
• consistent presets
• restraint and intention
With the right approach, every photo you edit becomes a step toward your signature look.
LIGHTROOM PRESETS
If you want to level up your photo editing and color grading, I’ve put together a page with my favorite presets — the ones that actually work — plus exclusive discounts. Open it in a new tab and save it for later, so you always have a go-to place for reliable tools and inspiration.
TAKE A LOOK