How to Edit Photos in Lightroom: A Step-by-Step Beginner Guide
Learning how to edit photos in Lightroom can feel overwhelming at first. There are sliders everywhere, dozens of panels, and no clear “right” way to start. The good news is this: you don’t need to master everything to get great results.
This beginner guide focuses on a simple, repeatable workflow that works for portraits, travel, lifestyle, and everyday photography. By the end, you’ll know exactly which tools matter, what to ignore, and how to turn a flat photo into a clean, professional edit.
LIGHTROOM PRESETS
If you want to level up your photo editing and color grading, I’ve put together a page with my favorite presets — the ones that actually work — plus exclusive discounts. Open it in a new tab and save it for later, so you always have a go-to place for reliable tools and inspiration.
TAKE A LOOKWhy Lightroom Is the Best Editing Tool for Beginners
Lightroom is designed for photographers, not graphic designers. Unlike complex editors, it focuses on color, light, and consistency — the things that matter most when editing photos.
Lightroom is beginner-friendly because it offers:
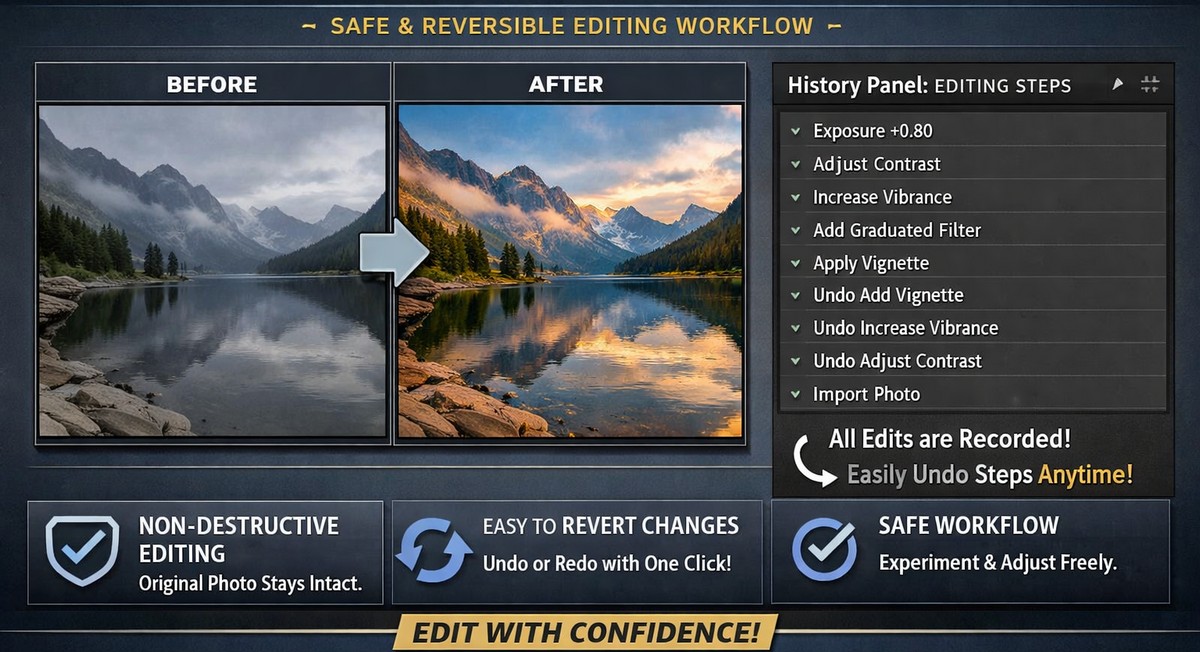
- non-destructive editing (you can’t ruin the photo)
- clear, logical panels
- powerful presets for fast results
- batch editing for consistency
- identical tools on desktop and mobile
Once you learn the basics, everything else builds naturally on top.
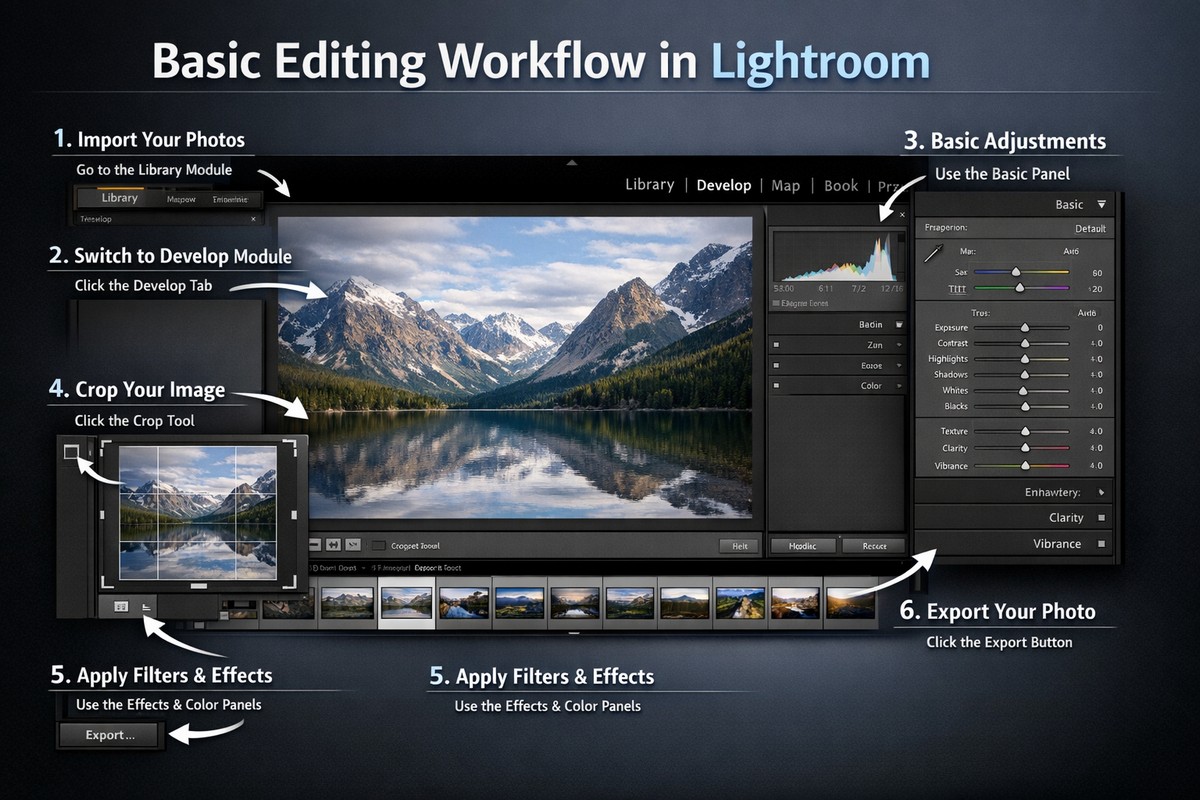
Step 1: Import Your Photos Correctly
Before editing, you need a clean starting point.
Use RAW Files Whenever Possible
RAW files contain much more color and light information than JPEGs. This gives you flexibility when adjusting exposure, shadows, and highlights.
If you shoot on a phone, use RAW or Pro mode if available.
Apply Lens Corrections First

In the Lens Corrections panel, enable:
- Remove Chromatic Aberration
- Enable Profile Corrections
This fixes distortion and color fringing before you start creative editing.
Step 2: Choose the Right Profile
Profiles affect the overall color and contrast of your photo before any sliders are applied.
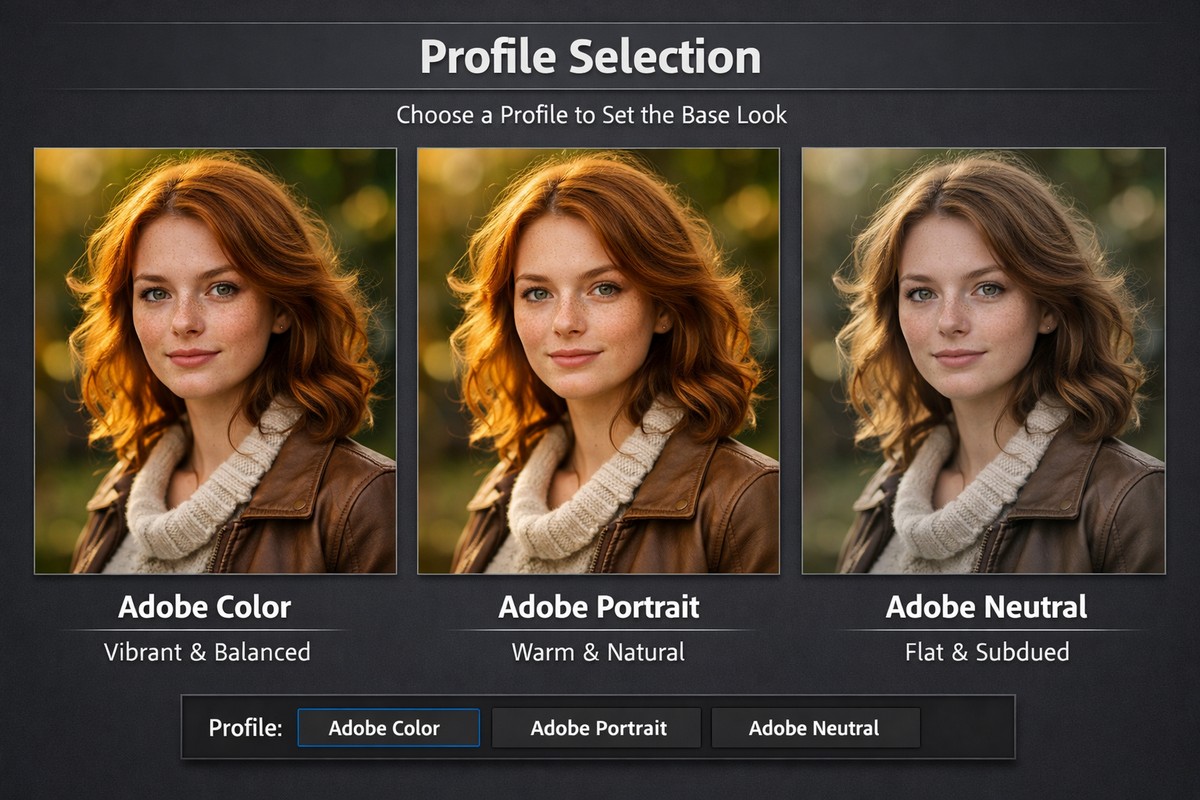
Try these beginner-friendly options:
- Adobe Color (balanced default)
- Adobe Portrait (great for people)
- Adobe Neutral (best for heavy editing later)
- Camera Standard (matches your camera look)
Profiles are not presets — they’re the foundation of your edit.
Step 3: Fix Exposure and Basic Light
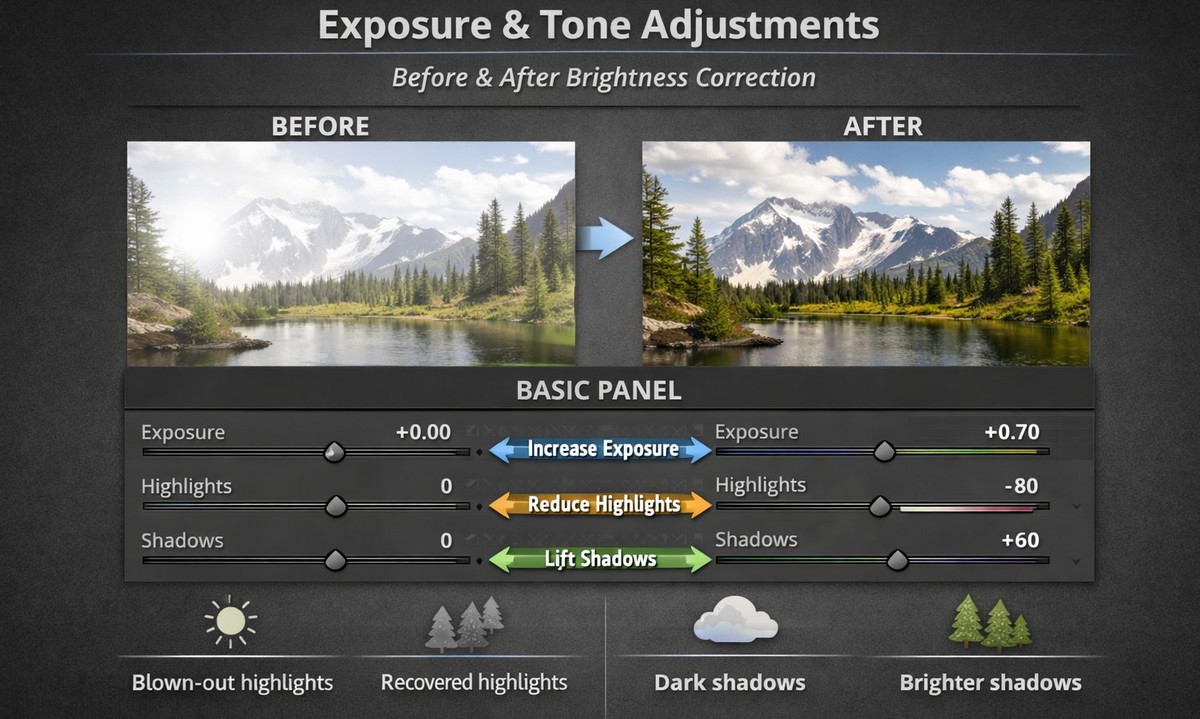
This is the most important step. A well-exposed photo always edits better.
Exposure
Adjust overall brightness. Avoid making the image too bright too early.
Highlights
Lower highlights to recover sky detail and bright areas.
Shadows
Lift shadows carefully to reveal detail without flattening the image.
Whites and Blacks
Use these to set contrast:
- Whites → bright points
- Blacks → depth
A clean edit has contrast, but never crushed details.
Step 4: Set White Balance Correctly
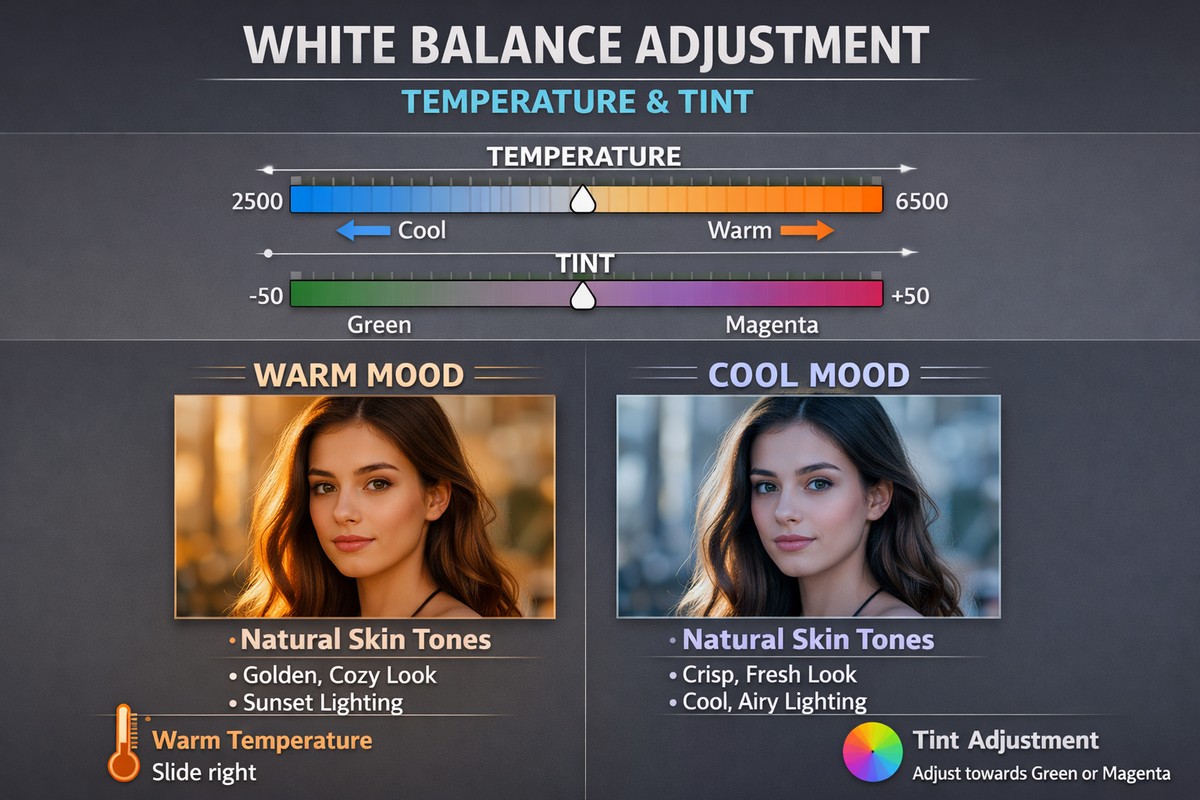
White balance controls the mood of your photo.
- Warmer = cozy, nostalgic, emotional
- Cooler = clean, modern, minimal
For beginners:
- Use the eyedropper on a neutral area
- Or adjust Temp and Tint manually until skin tones look natural
White balance should feel natural, not dramatic.
Step 5: Improve Colors Without Overdoing Them
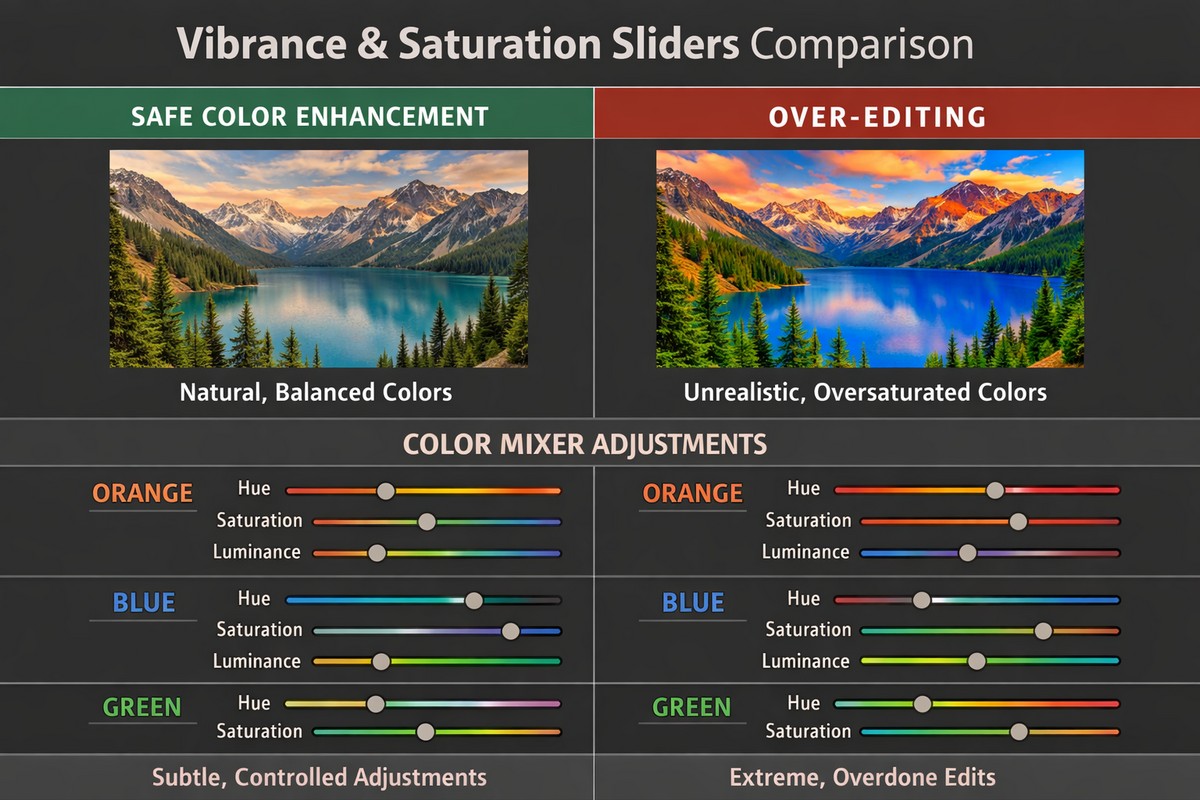
Color is where beginners usually go too far. Subtle adjustments win.
Vibrance vs Saturation
- Vibrance boosts muted colors safely
- Saturation boosts everything (use carefully)
Start with Vibrance, add Saturation only if needed.
Use the Color Mixer (HSL)
This allows precise control.
Examples:
- Reduce orange saturation for natural skin
- Darken blue luminance for deeper skies
- Lower green saturation for a moody look
Small moves here make a big difference.
Step 6: Use Presets the Right Way
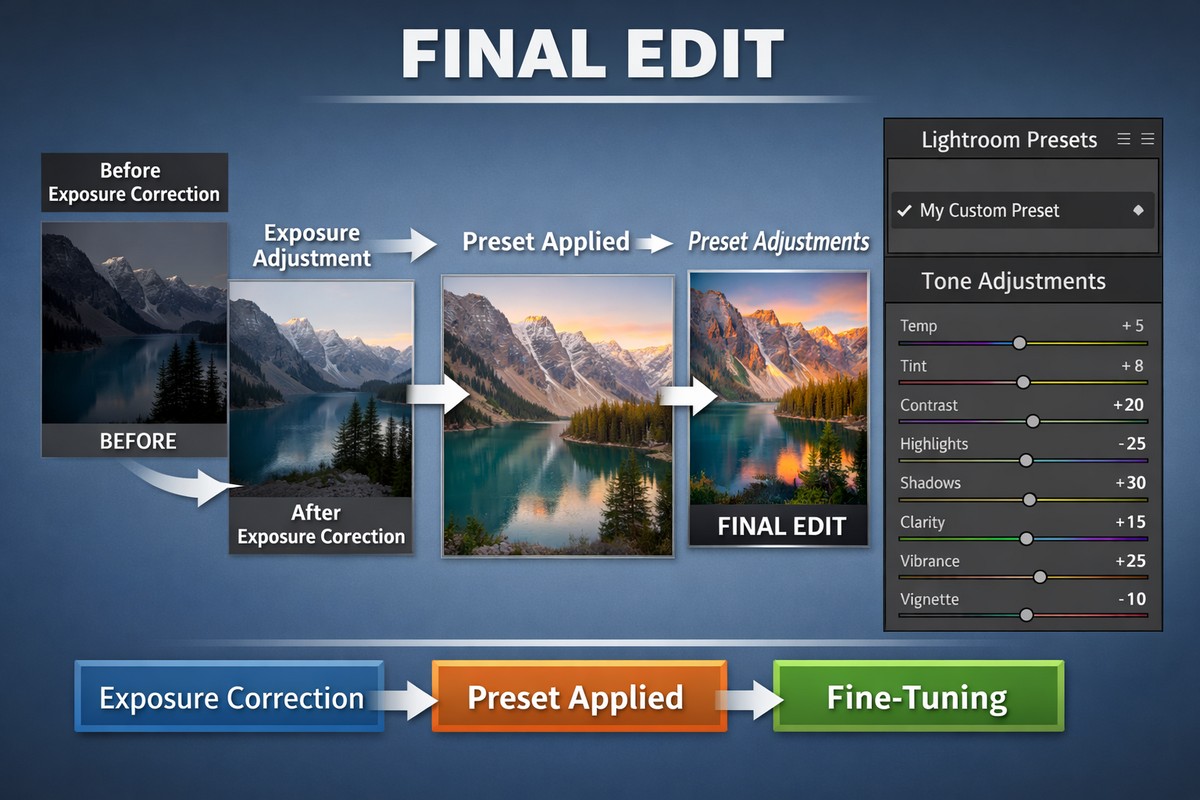
Presets are not cheating. They’re tools.
A good preset:
- speeds up editing
- creates consistency
- still allows manual adjustments
Apply the preset after fixing exposure, then fine-tune.
If a preset looks too strong, reduce its intensity or adjust exposure and white balance.
Step 7: Add Clarity, Texture, and Sharpening Carefully
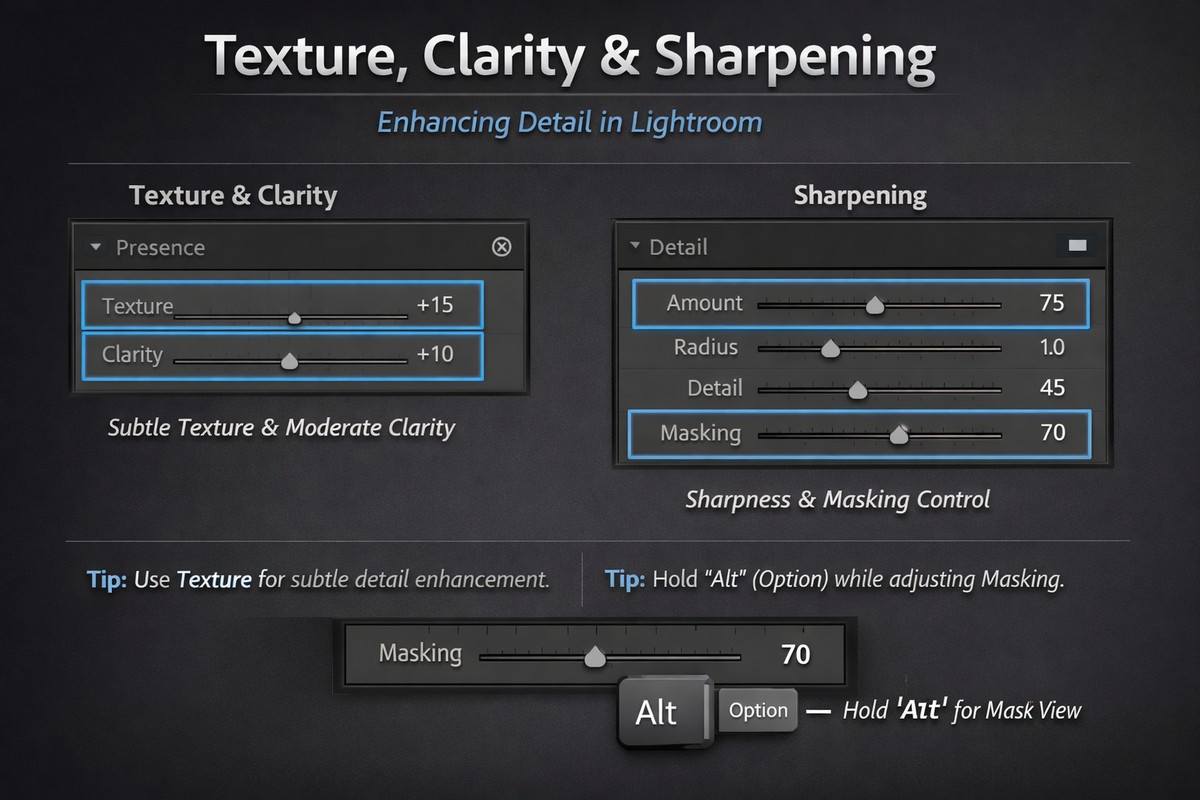
These tools affect detail and sharpness.
Texture
Improves fine detail. Great for portraits and objects.
Clarity
Adds contrast to midtones. Too much looks harsh.
Sharpening
For RAW photos:
- Amount: 40–70
- Masking: 50–90 (to avoid sharpening skin)
Always zoom to 100% when sharpening.
Step 8: Use Tone Curve for a Professional Look
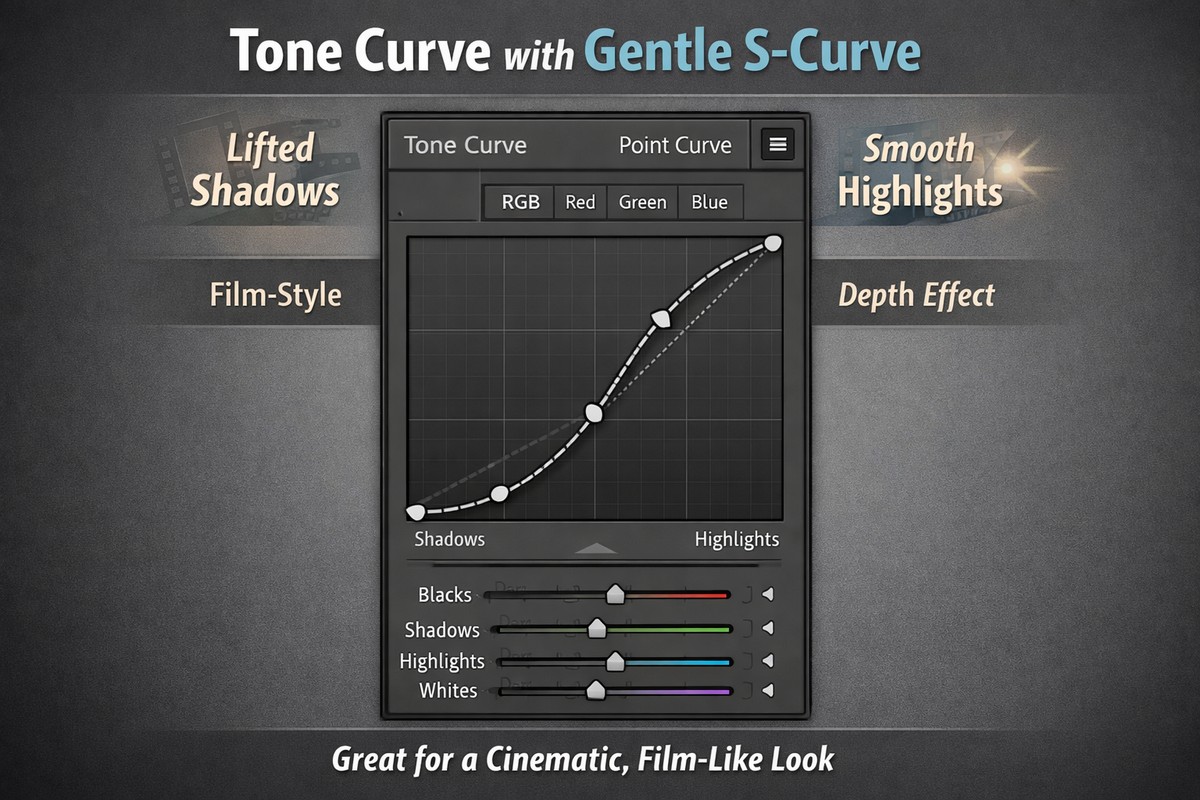
Tone Curve adds depth that sliders can’t.
Beginner tip:
- Create a gentle S-curve
- Lift shadows slightly for a soft look
- Avoid extreme curves
Tone Curve is key for film-style and cinematic edits.
Step 9: Improve Skin Tones (If Editing People)
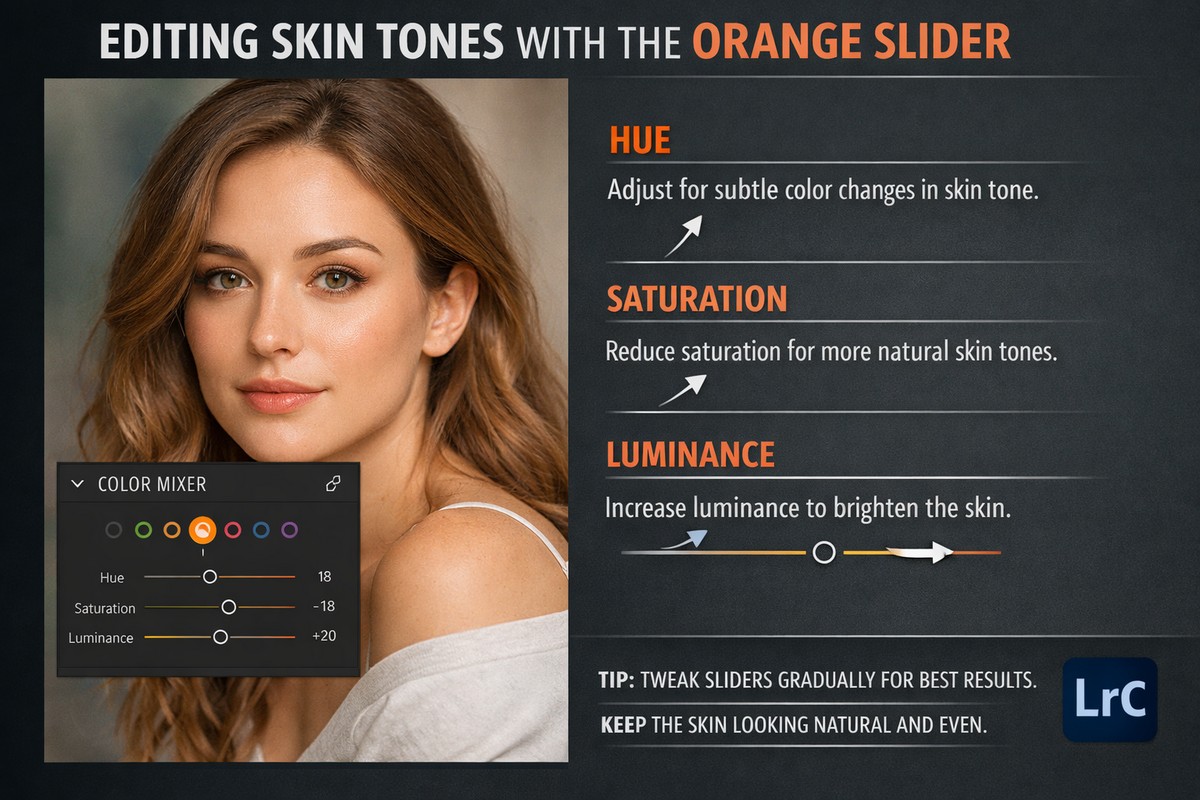
Skin tones matter more than anything else.
Orange Color Channel
- Hue: slightly toward yellow
- Saturation: reduce a bit
- Luminance: raise for softer skin
Avoid over-smoothing. Natural skin texture looks professional.
Step 10: Use Masks for Targeted Editing
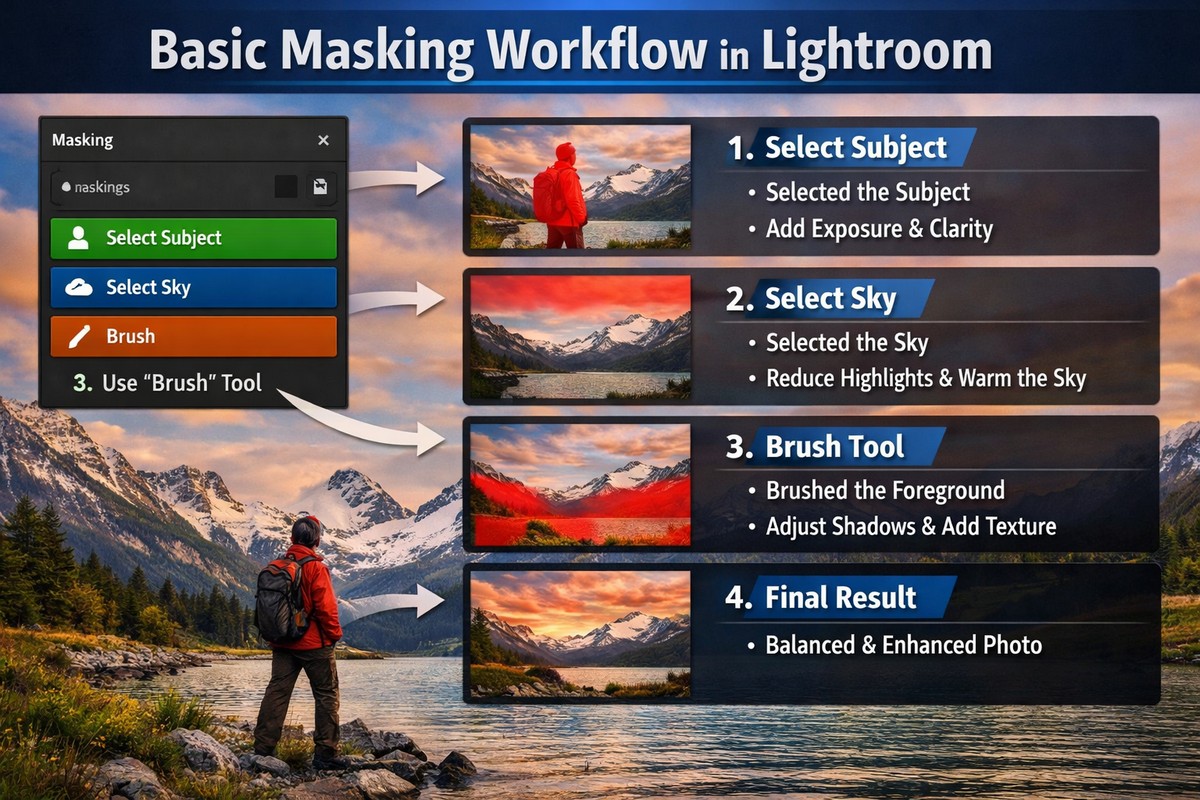
Masking lets you edit parts of the photo without affecting everything.
Useful beginner masks:
- Select Subject → brighten faces
- Select Sky → recover highlights
- Brush → fix small problem areas
Masking is one of Lightroom’s most powerful features.
Step 11: Keep Your Edits Consistent
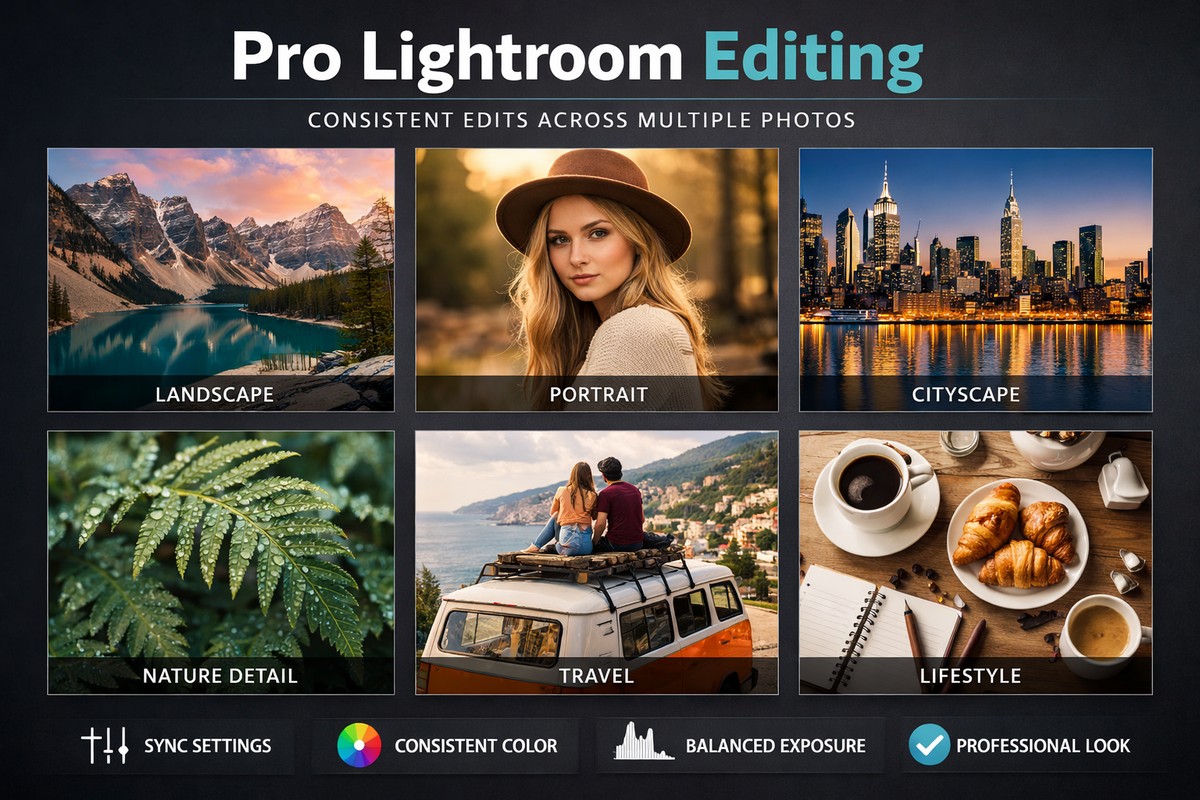
Consistency is what makes photos look professional.
Tips:
- Use the same preset across a set
- Sync settings between similar photos
- Avoid changing style mid-gallery
Consistency matters more than perfection.
Step 12: Export Settings for Beginners
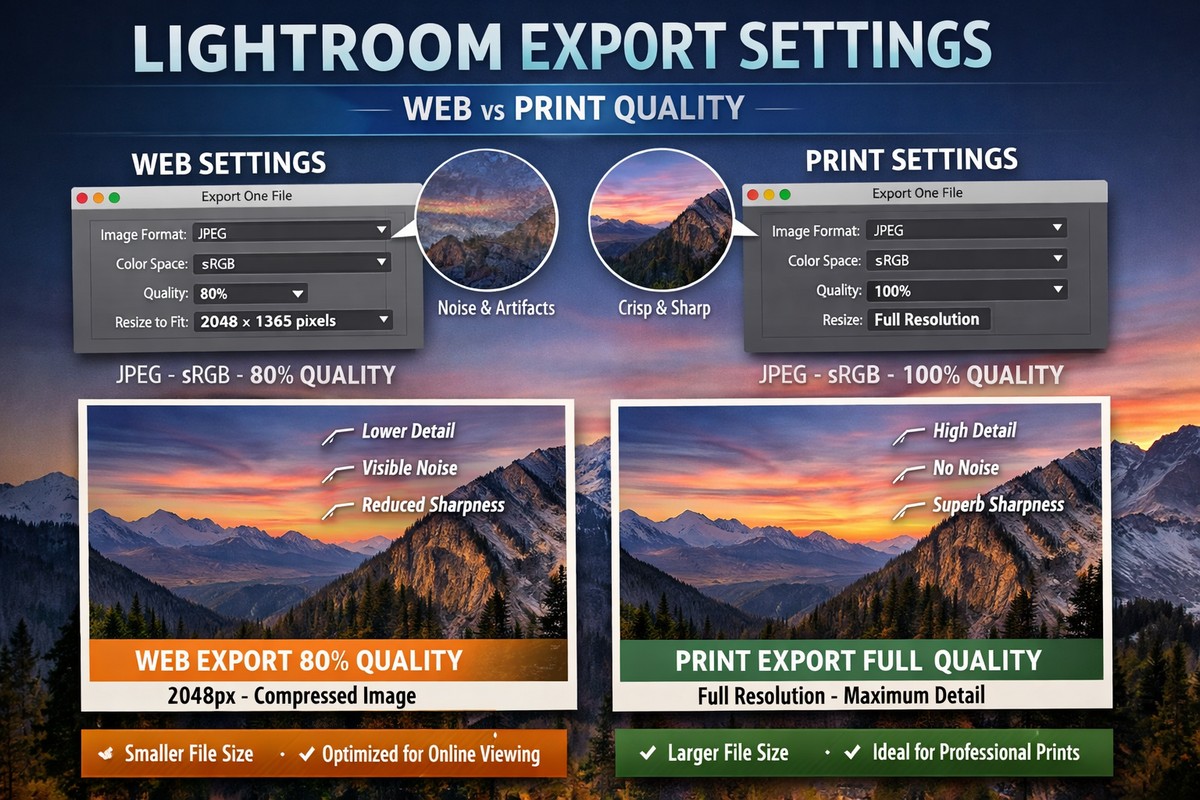
Bad export settings can ruin a good edit.
For web and social media:
- JPEG
- sRGB color space
- Quality: 80–85
- Resize long edge to 2048–3000px
For printing:
- Full resolution
- Highest quality
- Correct color profile
Common Lightroom Mistakes Beginners Make
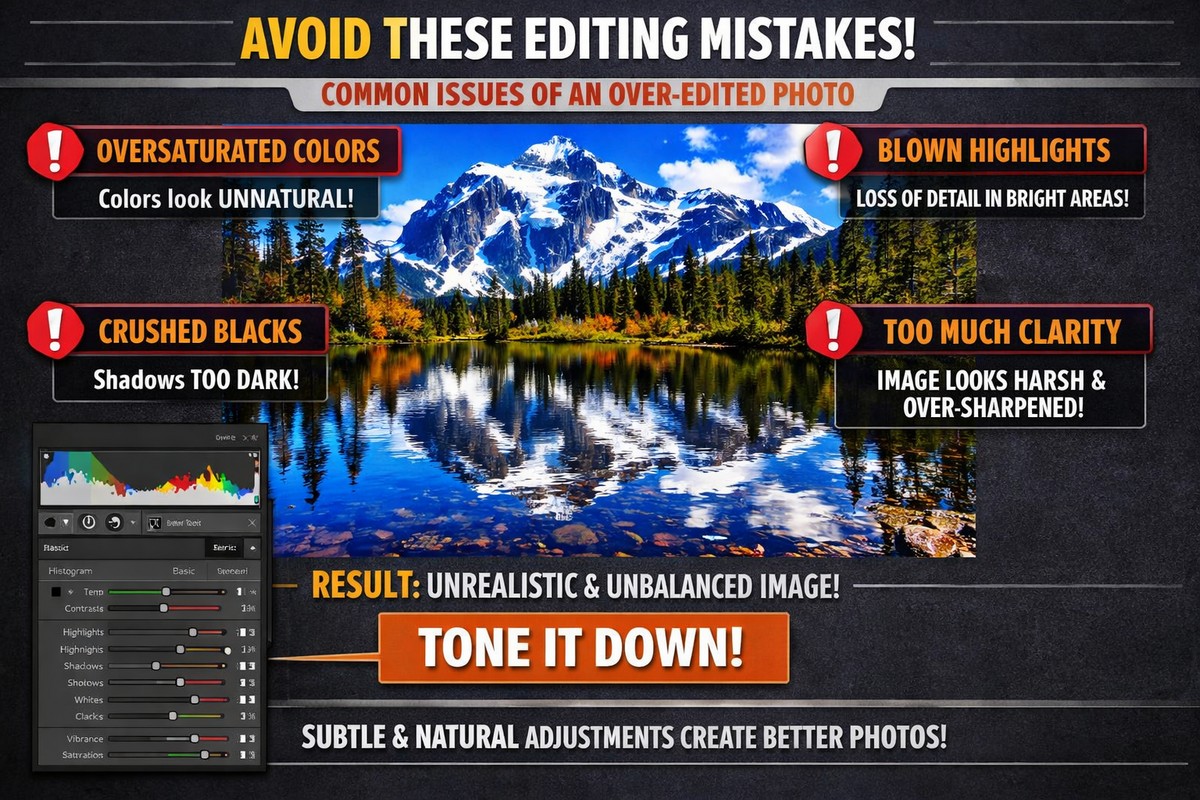
Avoid these early mistakes:
- Over-saturation
- Too much clarity
- Heavy grain
- Ignoring white balance
- Using one preset without adjustments
Clean editing always beats extreme editing.
Lightroom Desktop vs Lightroom Mobile
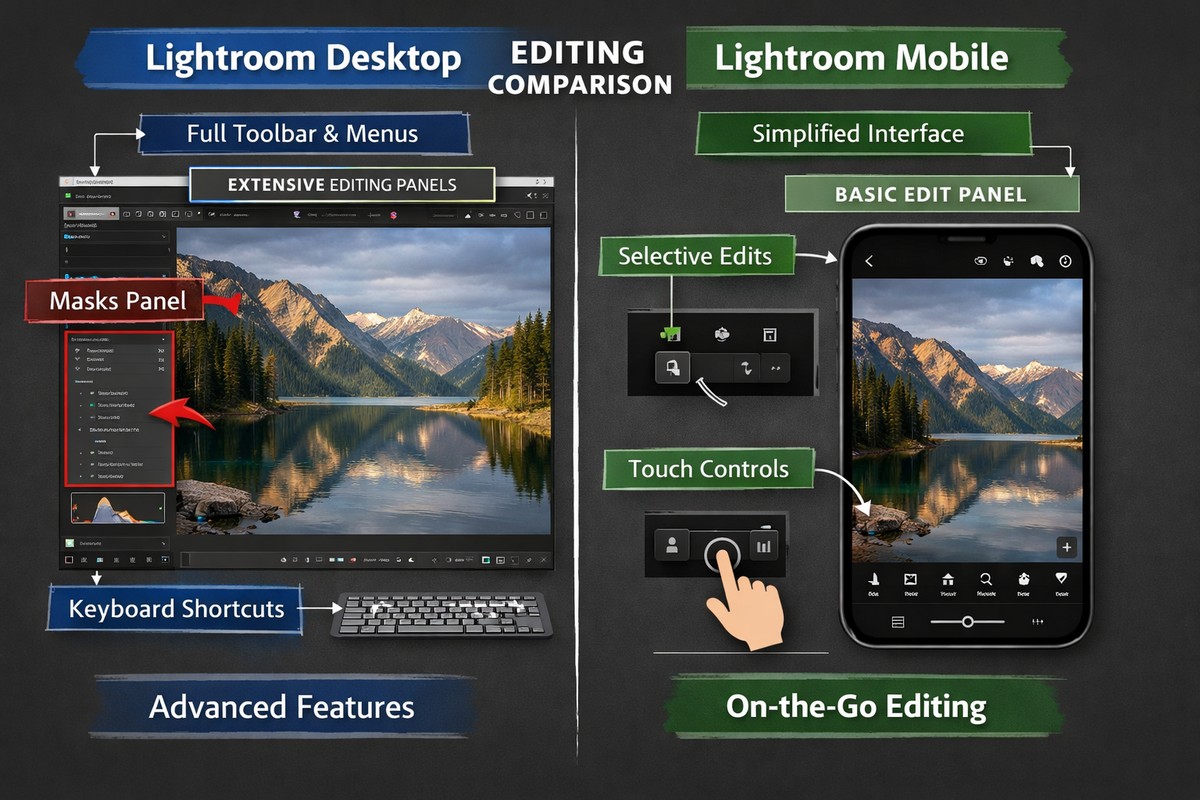
Both use the same engine, but workflows differ.
Desktop:
- better for RAW files
- more control
- ideal for large projects
Mobile:
- fast
- great for social media
- perfect for travel
Final Thoughts: Keep Your Workflow Simple
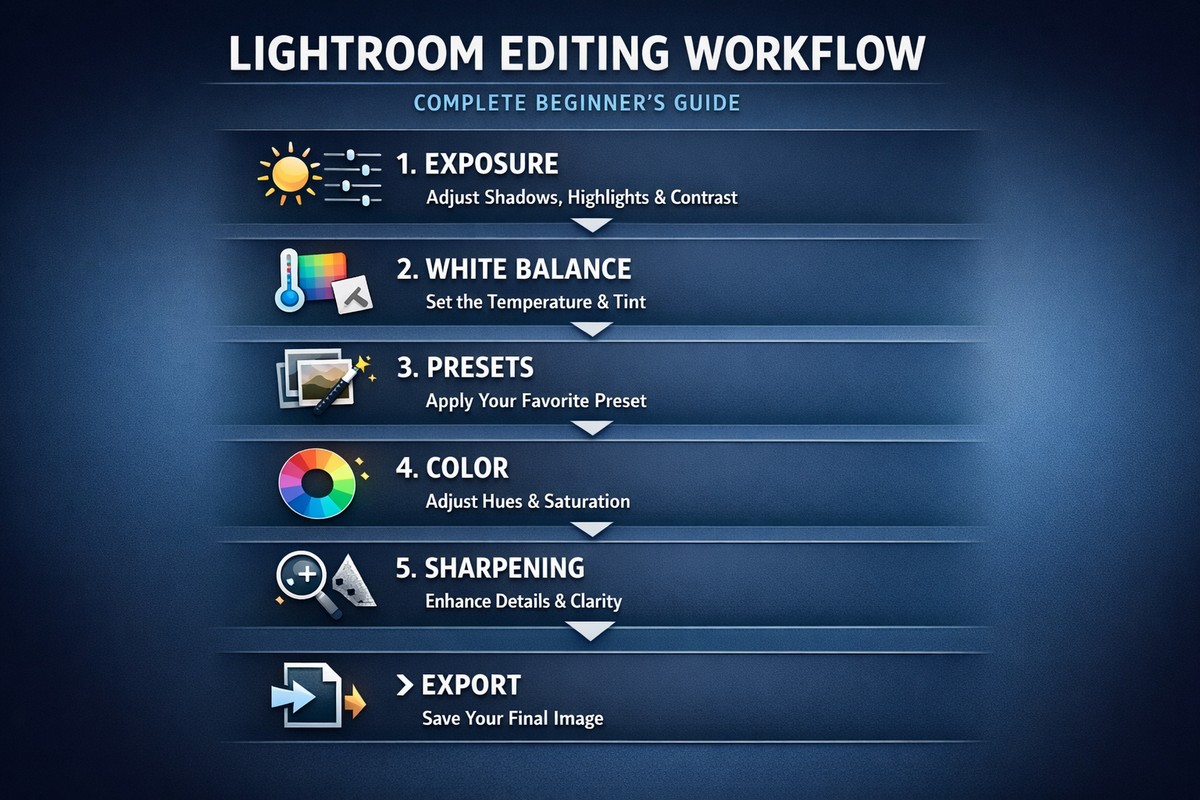
You don’t need to use every tool in Lightroom.
You need a repeatable system:
- Fix exposure
- Set white balance
- Apply preset (optional)
- Adjust colors
- Sharpen lightly
- Export correctly
Master this, and your edits will look clean, consistent, and professional — even as a beginner.
LIGHTROOM PRESETS
If you want to level up your photo editing and color grading, I’ve put together a page with my favorite presets — the ones that actually work — plus exclusive discounts. Open it in a new tab and save it for later, so you always have a go-to place for reliable tools and inspiration.
TAKE A LOOK